Trainer Handbook
| Site: | EbyE_v1 |
| Course: | Trainer Guide |
| Book: | Trainer Handbook |
| Printed by: | Guest user |
| Date: | Sunday, 25 October 2026, 2:37 PM |
COVER
TRAINER'S HANDBOOK


KA210-ADU · Small-scale Partnerships in Adult Education
EMPOWERED BY EMPATHY
EMOTIONAL INTELLIGENCE TRAINING PROGRAMME
IN THE CARE OF DISADVANTAGED CHILDREN
Project No: 2024-2-TR01-KA210-ADU-000264783
Coordinator: Kırıkkale Social Services Association (KISODER)
2026



IMPRINT
IMPRINT
Project Name: Empowered by Empathy – Emotional Intelligence in Caring for Disadvantaged Children
(Empatiyle Güçlenmek – Dezavantajlı Çocukların Bakımında Duygusal Zeka)
Project Type: Erasmus+ KA210-ADU – Small-scale Partnerships in Adult Education
Project Number: 2024-2-TR01-KA210-ADU-000264783
Coordinator: Kırıkkale Social Services Association (KISODER)
Partners: Kırıkkale Provincial Directorate of Family and Social Services (Türkiye)
Instytut Family Center (Poland)
Redefine (Portugal)
Funder: European Union – Erasmus+ Programme (through the Turkish National Agency)
Contributors
Selami Kaynakhan (Project Coordinator)
Dr. Magdalena Reka (Psychologist)
Dr. Franciszek Reka
Çiğdem Açıkyıldız Kazel (Social Worker)
Dr. Muradiye Oral (Psychologist)
Elif Eker Ataç (Psychologist)
Havva Şensoy (Sociologist)
Selda Usul Ergörün (Psychologist)
Büşra Şimşir Altaş (Social Worker)
Eda Sevinç Başer (Sociologist)
Funded by the European Union. The views and opinions expressed are, however, those of the author(s) alone and do not necessarily reflect those of the European Union or the Turkish National Agency. Neither the European Union nor the Turkish National Agency can be held responsible for them.
© 2026 Kırıkkale Social Services Association (KISODER)
This publication may be reproduced and shared for educational purposes, provided that the source is acknowledged; it may not be used for commercial purposes. This book is free of charge and may not be sold.
|
|
|


TRAINER'S HANDBOOK – AI-assisted language notice:
The English, Portuguese and Polish versions of this publication were prepared with AI support for translation and/or linguistic editing and were subsequently subject to human review and validation. Despite this review, residual translation, transcription or editorial errors may remain. In the event of any discrepancy, the Turkish source version should be consulted as the primary reference.
CONTENTS
CONTENTS
INTRODUCTION
SESSION 1: OPENING “HELLO”
SESSION 2: EMOTIONAL AWARENESS (SELF-AWARENESS) – RECOGNISING AND NAMING EMOTIONS
SESSION 3: MANAGING EMOTIONS AND CRISIS MANAGEMENT
SESSION 4: UNDERSTANDING ANOTHER PERSON – “EMPATHY”
SESSION 5: SOCIAL SKILLS AND CONFLICT RESOLUTION
SESSION 6: ASSERTIVENESS SKILLS – EXPRESSING YOURSELF AND DEFENDING YOUR RIGHTS
REFERENCES
APPENDICES
INTRODUCTION
TRAINER'S HANDBOOK
INTRODUCTION
This training programme was prepared within the scope of the “Empowered by Empathy” project to develop the emotional intelligence skills of staff who care for disadvantaged children and of foster families, enable them to communicate empathetically with children, and increase their professional resilience.
The main aim of this project is to prepare a training programme that supports caregivers in providing care in a way that develops children's emotional intelligence skills, with priority given to children in residential care while also supporting the healthy emotional development of all children, and to implement, sustain and disseminate this programme.
The absence of parental support creates a significant gap in children's emotional and social development. This makes the role of caregivers who interact directly with children vitally important. The adoption by care staff and other parental figures of approaches that are sensitive to children's emotional needs and based on empathy and emotional intelligence will make an important contribution to these children's healthy growth and integration into society.
Content responsibility notice: The substantive content of this publication reflects the material prepared and validated by the partner(s) responsible for this project output. Subsequent editorial and linguistic review, formatting, multilingual preparation and digital publication were carried out for consistency and dissemination purposes and do not constitute independent scientific or professional validation. Responsibility for the accuracy, completeness and validity of the substantive content remains with the partner(s) responsible for its production.
SESSION 1: OPENING
SESSION 1: OPENING “HELLO”

|
Step |
Target learning outcome (step title) |
Activity |
Method |
Duration |
|---|---|---|---|---|
|
1 |
Establishing a safe group bond |
Share Your Name and Your Feeling |
Getting-to-know-you game |
20 min |
|
2 |
Internalising the project vision |
Introduction to “Empowered by Empathy” |
Brief information session |
15 min |
|
3 |
Clarifying the training objectives |
Expectation Tree |
Interactive sharing |
20 min |
|
4 |
Creating a safe space and boundaries |
Our Rules |
Group Agreement |
20 min |
|
5 |
Exploring shared field practices |
“A Day on My Shift” |
Sharing ideas |
10 min |
|
6 |
Promoting emotional focus |
Breath and Body Awareness |
Warm-up exercise |
10 min |
|
7 |
Consolidating learning outcomes |
Key Sentences of the Day |
Summary |
15 min |
|
8 |
Collecting participant feedback |
“What Did We Put in Our Pockets Today?” |
Oral evaluation |
15 min |
|
9 |
Arousing curiosity and closing |
Bridge to the Next Session |
Closing |
10 min |
STEP 1: SAFE GROUP BOND
STEP 1: Building a Safe Group Connection - "Share Your Name and Feeling"
Note to the trainer: This step establishes the emotional foundation of the entire training. Participants may be together for the first time and many may be strangers to one another. Your aim is not to convey information but to create a safe space By taking the first step yourself, model emotional openness; this is what breaks down the fear of being judged.
Method: Getting-to-know-you game (throwing a ball).
Materials: A soft ball (stress ball or soft toy).
Implementation steps:
Preparation: Participants sit in a circle. The trainer holds the ball and explains the rules of the game:
“Hello and welcome, everyone. As we entered this room, each of us felt something - excitement, curiosity, tiredness, perhaps a little shyness. All of these feelings are fine. We will now begin with a simple game. I have two questions for the person holding this ball: What is your name? And how do you feel right now, in one word? I will begin: My name is [name], and right now I feel curious.” (The trainer throws the ball to a participant.)
Procedure: The ball is passed around the circle. The trainer gives a brief, non-judgemental acknowledgement:
“Thank you; it was good to hear that.”
No one has to give a long explanation - one word is enough.
Observation note: When the round is complete, the trainer writes the emotion words heard in the circle on the board and says:
“When I look at the board, I can see excitement, tiredness and curiosity. Emotional intelligence begins precisely here: first, by being able to notice what we are feeling. Over the coming weeks, we will explore this together in much greater depth.”
STEP 2: PROJECT VISION
STEP 2: Internalising the Project Vision - Introduction to “Empowered by Empathy”
Note to the trainer: When explaining why the project was prepared, avoid creating the atmosphere of a bureaucratic presentation. Help participants feel the message: “You are at the centre of this project because you do one of the most demanding jobs in the world.” The international dimension should be presented as a source of pride and belonging.
Method: Brief information and questions and answers.
Materials: Project summary slide or A4 brochure (optional).
Implementation steps:
Key message: The trainer begins within the following framework:
“The reason we are here today is this: you care for children who are disadvantaged, in need of protection or living in difficult circumstances. This is one of the most valuable jobs in the world. Research tells us that what leaves a lasting mark on a child's life is the quality of the emotional bond established with that child. This programme was designed precisely to strengthen that bond.”
Project introduction: The trainer explains that the “Empowered by Empathy - Emotional Intelligence in the Care of Disadvantaged Children” project, implemented under Erasmus+ KA210-ADU, is being carried out by three partners: Türkiye, as the country of the coordinating organisation, Portugal and Poland. The trainer adds:
“The knowledge you gain in this room is being shared at the same time with your colleagues in Portugal and Poland. Today you are here both for the children in Türkiye and as part of an international professional community.”
Programme structure: The programme is briefly presented as consisting of six sessions: emotional awareness, crisis management, empathy, social skills and assertiveness. Participants are invited to speak:
“Which of these topics are you most curious about?”
STEP 3: TRAINING OBJECTIVES
STEP 3: Clarifying the Training Objectives - Expectation Tree
Note to the trainer: This step enables you both to understand participants' needs and to convey the message that “your voice matters”. Approach the notes with genuine interest; observations from the field are both powerful and deeply felt. Leave the tree displayed on the board throughout the programme.
Method: Interactive sharing.
Materials: Sticky notes in different colours (two colours: one for expectations and one for challenges), pens and a large tree template drawn on the board.
Implementation steps:
Instructions: The trainer distributes the sticky notes and explains:
“I am now giving you two coloured pieces of paper. On the yellow one, write: ‘The most important thing I want to learn from this training is...’ On the green one, write: ‘The moment I find most difficult when working with children in the institution is...’ You do not have to write your name. When you have finished, place the yellow notes on the branches of the tree and the green notes on its roots.”
Reading and reflection: The trainer reads the sticky notes aloud, groups similar themes and says:
“When I look at this tree, I see some very powerful things. At the roots there are very honest observations such as ‘I do not know what to do during an anger outburst’ and ‘when a child starts shouting, I lose control too’. On the branches there are wishes such as ‘learning to stay calm’ and ‘forming a genuine bond with the child’. This tree is the map for the weeks ahead. And I promise you this: during this programme we will address every question at the roots.”
STEP 4: SAFE SPACE AND BOUNDARIES
STEP 4: Creating a Safe Space and Boundaries - Group Agreement
Note to the trainer: Do not dictate the rules; enable participants to create them. People take far greater ownership of rules they have established themselves. Emphasise the rule of confidentiality in particular, because personal experiences will be shared in later sessions.
Method: Creating a group agreement.
Materials: Large sheet of paper or board and coloured pens.
Implementation steps:
Opening: The trainer begins as follows:
“This group will grow together over the coming weeks. At times you will share very personal experiences - difficult moments, mistakes and emotional vulnerabilities. For this room to be genuinely safe, we need to establish some rules together. Tell me: what would need to be present in the room for you to feel comfortable in this type of training?”
Developing the rules: The trainer writes participants' suggestions on the board. Rules that have not yet been mentioned are introduced gently by asking: ‘What do you think about confidentiality? Should something personal that someone shares leave this room?’ The following rules are usually established:
Confidentiality - ‘What is shared here stays here.’
Active listening - Do not interrupt before the person speaking has finished.
Non-judgement - No feeling or experience is belittled.
Freedom to participate - If a question makes someone feel obliged to answer, they may say ‘Pass’.
Mobile phones on silent - Throughout the meeting unless there is an emergency.
Approval of the agreement: When the rules have been completed, the trainer says:
“We all promise to follow these rules. Please raise your hand if you make that commitment.” (A brief silence and applause.) “Excellent. This is now our Group Agreement. It will remain displayed on the board.”
STEP 5: FIELD PRACTICES
STEP 5: Exploring Shared Field Practices - “A Day on My Shift”
Note to the trainer: This step has two aims: to enable participants to learn from one another's experience and to convey the message ‘You already know a great deal; this programme will organise that knowledge’. Do not underestimate the wisdom of field practice; connect it with the theoretical framework.
Method: Sharing ideas.
Materials: Whiteboard.
Implementation steps:
Question: The trainer divides the participants into small groups of three or four and asks: “A child in the institution suddenly has an anger outburst - shouting and throwing objects. What do you instinctively do at that moment? Discuss this in your group for three minutes. If you have a method that works in practice, share it.”
Large-group sharing: A representative from each group presents its findings. The trainer writes good examples on the board and notes the principles on which they are based (for example, ‘leaving physical distance’ → personal space; ‘speaking quietly’ → co-regulation). The trainer continues:
“As you can see, you already do many things correctly on an intuitive level. The purpose of this programme is to place that intuition within a framework - to understand why it works - so that you can apply it consistently and consciously.”
STEP 6: EMOTIONAL FOCUS
STEP 6: Promoting Emotional Focus - Rhythmic Breathing Exercise
Note to the trainer: This brief but powerful step serves two functions: it brings participants mentally ‘here’ from the rush of the morning and offers a first experience of the ‘calming techniques’ that will be taught in the next session. Lower your voice and slow the pace.
Method: Guided breathing exercise.
Materials: None.
Implementation steps:
Introduction: The trainer begins in a slow, calm voice:
“I am going to teach you a very simple but very powerful tool. It is called Rhythmic Breathing. This technique is included both for you and so that you can later teach it to children. Are you ready? You may keep your eyes open; simply turn your attention inward for a moment.”
Exercise (three rounds):Breathe in through your nose for four seconds... hold for four seconds... breathe out slowly through your mouth for four seconds... wait for four seconds. Repeat this cycle three times.
Reflection: At the end of the exercise, the trainer asks:
“How was it? Did anyone notice anything? (Brief comments.) That is all - within 16 seconds the brain begins to move from alarm mode towards calm mode. We will explore this technique in much greater depth in the next session. For now, keep it in mind.”
STEP 7: LEARNING CONSOLIDATION
STEP 7: Consolidating Learning Outcomes - Pre-test and Key Sentences of the Day
Note to the trainer: The pre-test should not make participants feel that they are sitting an examination; it should make visible the question ‘What do we know now, and what will we know at the end of this programme?’ The same test will be administered again during the final session and progress will become visible - explain this to participants.
Method: Individual written evaluation and summary.
Materials: Pre-test form (one copy for each participant).
Implementation steps:
Administering the pre-test: The trainer distributes the form and explains:
“This is not an examination; it is a snapshot of the starting point. There are no right or wrong answers. Write what you think today; at the end of the programme you will complete the same form again and see your own progress.” (Allow five to seven minutes.)
Key sentences of the day: After the pre-test, the trainer writes the day's three main messages on the board and reads them aloud:
“Research suggests that emotional intelligence (EQ) may be at least as important a factor in life success as academic intelligence (IQ).”
“You are the most powerful role model a child observes - when you manage your own emotions, you are teaching the child silently.”
“We cannot eliminate risks, but we can strengthen children's protective factors.”
STEP 8: PARTICIPANT FEEDBACK
STEP 8: Collecting Participant Feedback - “What Did We Put in Our Pockets Today?”
Note to the trainer: Listen carefully to what participants say during this step. Their responses provide valuable information both for shaping the next session and for reading the group's emotional barometer. Encourage brief and sincere answers.
Method: Oral evaluation in a circle.
Materials: None.
Implementation steps:
Question: The trainer asks participants to form a circle and asks each person:
“What is the most important thing you are putting in your pocket as you leave today? A word, a sentence - whatever comes to mind.”
Receive the answers without judgement, with a simple ‘yes, thank you’ or a brief nod. Do not correct or comment on them.
STEP 9: CLOSING AND NEXT SESSION
STEP 9: Arousing Curiosity and Closing - Bridge to the Next Session
Note to the trainer: This step does not close a door; it ends by opening the next one. Participants should leave curious about what they will learn in the following session. Your closing sentence should be energetic and hopeful.
Method: Brief information and closing.
Materials: None.
Implementation steps:
Bridge sentence: The trainer creates interest in the next session by saying:
“Next week you will be introduced to a very powerful tool: the RULER Method, developed by Yale University and used in more than 100 countries around the world. This method teaches a child to say ‘I feel disappointed’ instead of ‘I feel good’ - in other words, to name the emotion precisely. Research shows that children who can name their emotions accurately experience fewer behavioural problems. Think about how important that is.”
Closing: The trainer looks at everyone and concludes:
“Today you did something very important: you were here. Both for yourselves and for the children in your care. That takes courage. Thank you all very much. See you next week.”
Participants' curiosity is aroused by announcing that the next session will involve work with two of the most powerful tools used in child psychology: the Yale University-approved RULER Method and the Mood Meter. The session is closed by thanking participants for their attendance.
SESSION 2: EMOTIONAL AWARENESS
SESSION 2: EMOTIONAL AWARENESS (SELF-AWARENESS) - RECOGNISING AND NAMING EMOTIONS
|
Steps |
Learning outcomes |
Activity |
Method |
Duration |
|---|---|---|---|---|
|
1 |
Recognising and naming emotions |
Introduction to the Mood Meter |
Interactive presentation |
20 min |
|
2 |
Distinguishing basic emotions |
Application of the RULER Method |
Direct instruction |
15 min |
|
3 |
Reading emotions through body language |
“What Is My Body Language Saying?” |
Role-play |
20 min |
|
4 |
Monitoring emotions in daily life |
“The Mood Meter on the Fridge” |
Group work |
20 min |
|
5 |
Understanding the power of naming an emotion |
“Emotional Vocabulary” activity |
Questions and answers |
15 min |
|
6 |
Integration into daily life |
“Being a Potato” (emotional expression) |
Physical activity |
20 min |
|
7 |
End-of-session reinforcement |
Review of key concepts |
Metaphor/anecdote |
10 min |
|
8 |
Evaluation and closing |
Participants’ views |
Oral feedback |
10 min |
STEP 1: RECOGNISING EMOTIONS
STEP 1: Recognising and Naming Emotions
Note to the trainer: Help participants break the pattern of saying “I feel good / I feel bad”. Emphasise that all emotions are biological information, without dividing them morally into “right or wrong”.
Method: Interactive presentation and individual mapping.
Materials: Large Mood Meter poster and coloured sticky notes.
Implementation steps:
1. Presentation of the Mood Meter: The trainer projects the Mood Meter image onto the board. The trainer explains the diagram in the following words:
“Dear colleagues, emotions are not simply divided into ‘good’ or ‘bad’. To understand them better, we will look at two axes: the horizontal axis shows ‘pleasantness’ (feeling positive/negative), while the vertical axis shows our level of ‘energy’ (high/low). These two axes lead us to four coloured zones:
Red Zone: High energy, negative pleasantness (anger, anxiety, fear).
Blue Zone: Low energy, negative pleasantness (sadness, tiredness, disappointment).
Yellow Zone: High energy, positive pleasantness (happiness, excitement, enthusiasm).
Green Zone: Low energy, positive pleasantness (calmness, peace, relaxation).
2. Create Your Own Emotion Map: Participants are asked to consider their current levels of energy and pleasantness, select the colour that best represents them on the Mood Meter poster and mark it with a sticky note.
STEP 2: Distinguishing Basic Emotions
STEP 2: Distinguishing Basic Emotions
Note to the trainer: Focus on the first stages of the RULER Method developed by Yale University. Deepen the “Understanding” stage to prevent staff from merely labelling children as “misbehaving” when observing them.
Method: Direct instruction and questions and answers.
Materials: Whiteboard.
Implementation steps:
1. Introduction to RULER: The trainer explains the foundations of the method as follows:
“To be able to manage children’s emotions, we need the first two stages of the RULER Method:
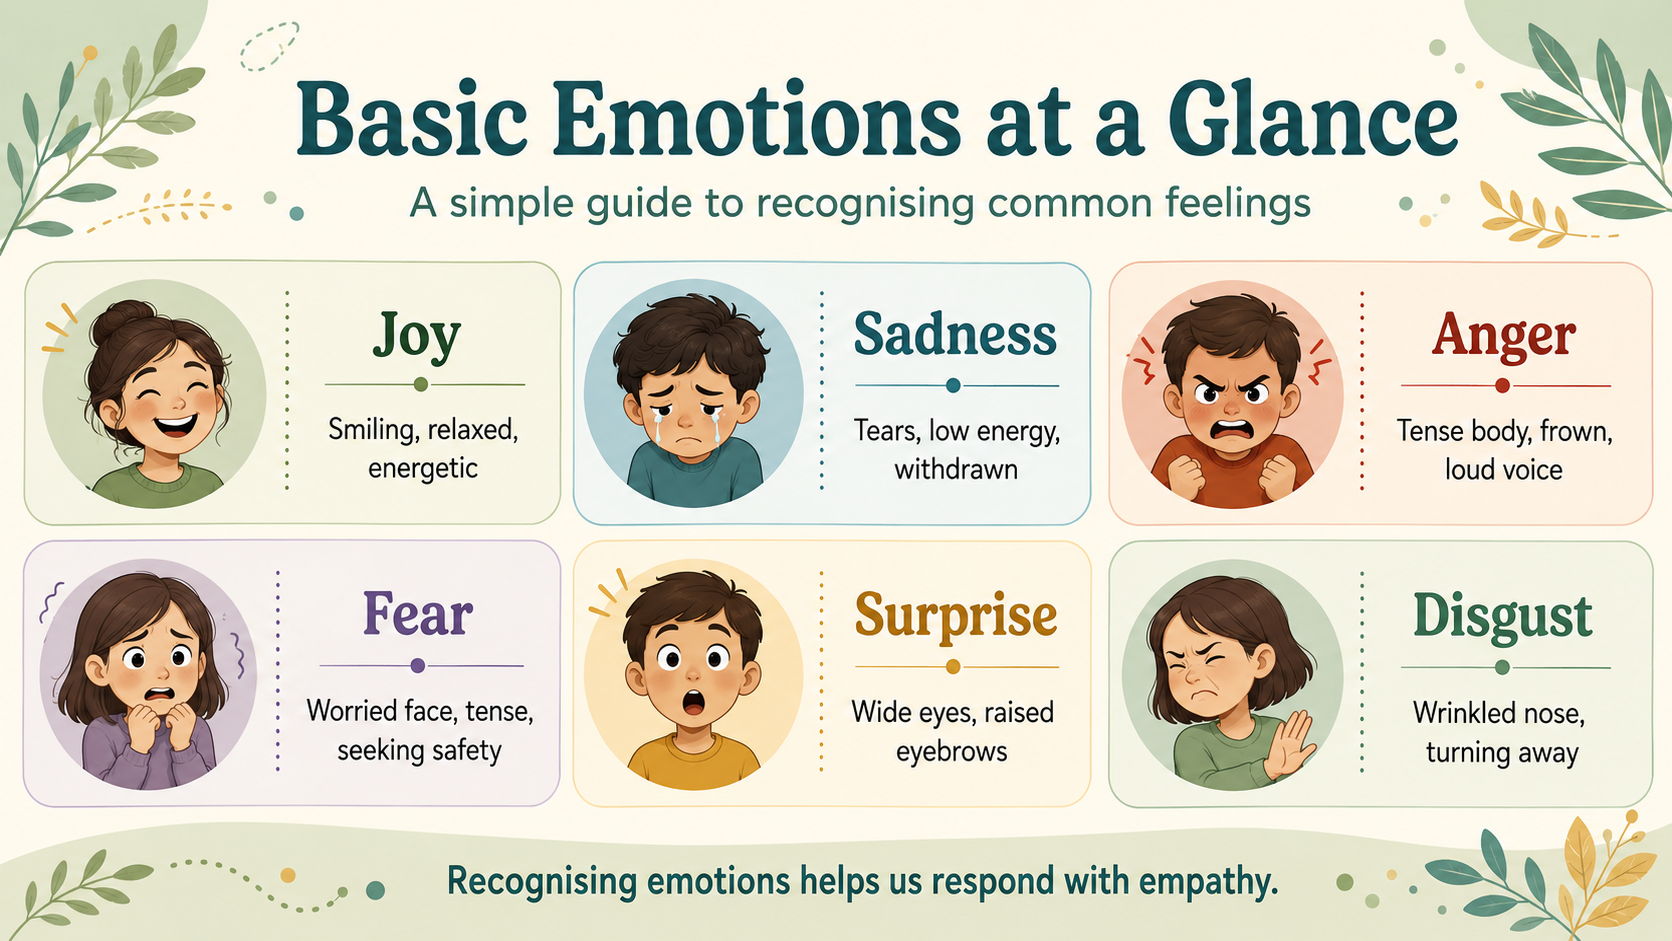
Recognising: Reading clues in the child’s facial expression, tone of voice and shoulders. If the child’s eyebrows are furrowed, we should quickly recognise that they are in the red zone; if their shoulders are slumped and they are looking at the ground, they are in the blue zone.
Understanding: Finding the reason for the emotion. Why is the child angry? Is it because a friend took the toy from their hand, or because the child has not slept enough? Understanding the cause enables us to respond appropriately.”
2. Trainer’s question: Ask participants: “When you have seen a child in the institution frowning (Recognising), what observations have you made in the past to find the real reason behind it (Understanding)?” Ask participants for two or three examples.
STEP 3: BODY LANGUAGE
STEP 3: Reading Emotions through Body Language
Note to the trainer: Help participants recognise how clearly emotions can be communicated without words and how strongly their own posture can affect children.
Method: Role-play / enactment.
Materials: Small pieces of paper with emotion names written on them.
Implementation steps:
1. “What Is My Body Language Saying?” game: Participants form pairs. One person in each pair secretly draws an emotion card from a bag (for example, disappointment, anxiety, guilt or enthusiasm). 2. Enactment rules: The participant who draws the card acts out the situation without speaking, using only body language, eye contact, posture and facial expressions. Their partner tries to identify the emotion by using the RULER skill of “Recognising”. 3. Discussion: At the end of the game, the following question is put to the group: “Children do not always communicate with us in words. How does reading non-verbal communication affect a disadvantaged child’s need to be ‘seen and understood’?”
STEP 4: DAILY EMOTION TRACKING
STEP 4: Monitoring Emotions in Daily Life
Content: Emphasise the importance of recording changes in the child’s emotions during the day through “The Mood Meter on the Fridge” as part of the caregiving process.
Note to the trainer: Explain that this activity is not a scoring or disciplinary tool, but a safe-space practice that helps the child make their inner world concrete through colours. Emphasise the importance of using “The Mood Meter on the Fridge” to record changes in the child’s emotions during the day as part of caregiving.
Method: Group work and brainstorming.
Materials: Sample Mood Meter design for a fridge/common area.
Implementation steps:
1. Explanation of the routine design: The trainer presents the activity described in the guide:
“To help children move beyond simply saying ‘I feel bad’, we will display Mood Meters in common areas (for example, on fridges in living areas or in rest rooms). Every day, we will carry out routine check-ins with the children by asking, ‘Which colour are you on the Mood Meter right now?’ The aim is to help them make their inner world concrete through colours.”
2. Institutional integration activity: Participants form small groups and prepare a practical plan for when (for example, after school or before dinner) and how this routine can be used during their own shifts.
STEP 5: NAMING EMOTIONS
STEP 5: Understanding the Power of Naming an Emotion
Note to the trainer: Discuss how moving beyond general words such as “angry” or “sad” by developing an “emotional vocabulary” can be a key to resolving a child’s difficulty. Use a case example to show how a rich emotional vocabulary among participants can help children resolve cognitive confusion more quickly.
Method: Questions and answers and interactive discussion.
Materials: Whiteboard.
Implementation steps:
1. The importance of labelling: The trainer introduces the RULER stage of “Labelling” using the following statements:
“When we find a precise and clear name for an emotion, the brain automatically begins to move from emotional mode towards problem-solving mode. There is a major difference between a child merely saying ‘I am angry’ and saying ‘I feel excluded/frustrated right now’. Therefore, the richer our vocabulary related to emotions, the more easily we can name the emotion we are experiencing.”
2. Vocabulary enrichment exercise: Write “ANGRY” and “BAD” in capital letters on the board.
Ask participants to generate more specific intermediate words that children could use instead (for example, jealous, disappointed, offended or treated unfairly).
STEP 6: Integration into Daily Life
STEP 6: Integration into Daily Life
Note to the trainer: This step involves full-body movement. While enabling caregivers to enjoy themselves, demonstrate practical ways to release the physical tension caused by intense emotions in the body (muscle contraction and rapid breathing).
Method: Creative drama / physical activity.
Materials: A large open activity space.
Implementation steps:
1. “Being a Potato” game: The trainer asks participants to stand and form a large circle. Participants are asked to imagine that they are potatoes. 2. Giving instructions: Using exaggerated facial expressions and tone of voice, the trainer gives the following instructions in sequence and asks staff to act them out with their bodies and faces:
“Now you are at the market, crammed into a bag (expressions of surprise/fear). Now you are in the kitchen and your skins are being peeled (tension/excitement). And now... you have been thrown into hot oil! (Shake the whole body to release stress and energy).”
3. Emphasis on regulation: At the end of the game, explain that this activity is an excellent regulation tool for increasing children’s inner awareness and enabling them to release stress from their bodies in an enjoyable way.
STEP 7: End-of-Session Reinforcement
STEP 7: End-of-Session Reinforcement
Note to the trainer: Bring all the concepts of the day together in one memorable image.
Method: Metaphor and anecdotal narration.
Implementation steps:
1. The sky metaphor: The trainer summarises the session using the following powerful metaphor:
“Dear colleagues, today we have seen that our emotions are our compass. Our inner world is like a boundless sky. Anger, sadness and disappointment are the grey, stormy clouds passing across that sky. Clouds come, change shape and pass, but the sky is always there. Our aim is not to teach children to eliminate the clouds, but to recognise and name them within the safety of the sky.”
STEP 8: Evaluation and Closing
STEP 8: Evaluation and Closing
Note to the trainer: To make the training lasting, close the session by asking participants to say what they are taking away from today’s training - the most important thing they have learnt.
Method: Oral feedback and closing circle.
Implementation steps:
1. “What Did We Put in Our Pockets?” circle: All participants stand side by side in a circle. The trainer asks each person in turn: “As we finish today’s module, what is the most important piece of information or tool that will remain in your mind when you approach a child during tomorrow’s shift? Please share with us that one sentence you are putting in your pocket.” 2. Closing: After feedback has been received from all participants, the trainer announces that the next module will cover how to manage these emotions and remain calm during a crisis (Crisis Management), and then ends the session.
SESSION 3: CRISIS MANAGEMENT
SESSION 3: MANAGING EMOTIONS AND CRISIS MANAGEMENT

|
Step |
Target outcome (step title) |
Activity |
Method |
Duration |
|---|---|---|---|---|
|
1 |
Managing emotional impulses |
Turtle Technique (4 steps) |
Role-play |
25 min |
|
2 |
Delayed gratification and compliance with rules |
Theraplay games (blowing cotton wool) |
Practical game |
25 min |
|
3 |
Safe expression of emotions |
Scenario activity with emotion puppets |
Group work |
20 min |
|
4 |
Calming down during a crisis |
“Self-Talk” practice |
Case analysis |
15 min |
|
5 |
Establishing and protecting boundaries |
Roles, responsibilities and boundaries |
Questions and answers |
15 min |
|
6 |
End-of-session reinforcement and closing |
Review of key concepts |
Metaphor/oral feedback |
10 min |
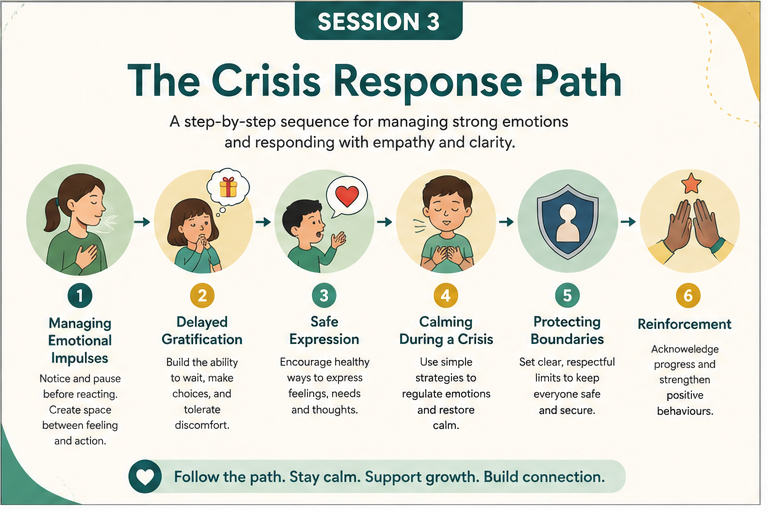
STEP 1: Managing emotional impulses
STEP 1: Managing emotional impulses
Materials: Turtle images or infographic.
Implementation steps:
1. Explaining the technique: The trainer explains the four-step Turtle Technique from the guide:
“Dear colleagues, the Turtle Technique is very different from simply telling children to ‘calm down’. It is a concrete neuropsychological tool that teaches children how to use their own biological braking mechanism during a crisis. The technique consists of four steps: 1) Notice your emotion and say ‘Stop’. 2) Imagine withdrawing into your turtle shell and wrap your arms around your body. 3) Take a deep breath and tell yourself, ‘I can calm down’. 4) When you are calm, come out of your shell and try to solve the problem.”
2. Role-play practice: Participants work in pairs. One person takes the role of a child experiencing intense anger, while the other takes the role of the caregiver guiding the child and enacts the four steps.
STEP 2: DELAYED GRATIFICATION
STEP 2: Delayed Gratification and Compliance with Rules
Note to the trainer: Enable participants to experience directly how this Theraplay-based game helps impulsive children develop their internal braking mechanisms (self-control).
Method: Practical game.
Materials: Small balls of cotton wool.
Implementation steps:
1. Rules and explanation of the game: The trainer addresses the participants:
“We are now going to play the Cotton-Wool Blowing Game described in our guide. We will lie opposite one another on the floor or across a table. You will take turns blowing the cotton-wool ball placed between you, but only when I give the command ‘Blow’. Blowing before the command is not allowed. This simple activity teaches children, in an enjoyable way, to wait for an instruction and restrain their immediate impulses.”
2. Practice: The whole group experiences the game in pairs at tables. A brief discussion is held about the urge to act that arises in the body while waiting for the instruction.
Brief Post-Activity Evaluation
“Dear colleagues, did you notice what happened while playing the game? You were opposite one another, the cotton wool was in the middle, you filled your lungs with air and, just as you were about to blow, I said ‘Stop’ or delayed the instruction. You felt a momentary contraction and impatience in your body. That feeling is an impulse. The weakest muscle in the brains of impulsive children is the ‘waiting time between desire and action’. As soon as a child sees the cotton wool, they do not reason; the primitive brain immediately says, ‘Blow now and win’. When we activate the command mechanism, we make the child’s prefrontal cortex - the centre of logic and self-control - work. Every second that the child waits for the command to blow strengthens the ‘waiting and self-restraint muscle’ that they can use before acting during a crisis in life.”
“After playing this game with children, do not end it immediately. Sit beside the child and use the ‘Understanding and Labelling’ stages of the RULER Method to have the following short conversation:
‘Did you notice? You were just about to blow before I said “Blow”, but you stopped yourself. What did you feel inside at that moment? Impatience? Excitement? Being able to stop yourself then was a wonderful strength. During the day, when you are about to become angry with a friend and throw something, you can use that same powerful inner brake.’
This conversation will transform the physical experience in the game into an awareness of emotional control that the child can use during crises in daily life.”
STEP 3: Safe Expression of Emotions
STEP 3: Safe Expression of Emotions
Note to the trainer: Remind participants that children may find it frightening to speak directly about intense emotions as their own. Emphasise the “safe distance” provided by puppets.
Method: Group work.
Materials: Two hand puppets or soft toys.
Implementation steps:
1. The safe-distance metaphor: The trainer explains the method as follows:
“Children may be unable to describe intense feelings of anger, jealousy or injustice directly as their own. Directly owning the emotion may create guilt, shame or fear of punishment. This is where puppets act as a magical bridge, enabling the child to process the intense emotion from a safe distance. When a child takes a puppet, they move the enormous anger out of themselves and place it on the inanimate object in front of them. In psychology this is called ‘projection’ and ‘safe distancing’. The child is no longer speaking on their own behalf, but on behalf of the ‘Angry Dragon’ or the ‘Hurt Bear’. A child may be unable to tell an adult directly, ‘I am very jealous of my friend and I want to hit them.’ Through a puppet, however, the child can express the feeling in the red zone without censorship by saying, ‘This bear is very angry because its friend did not share the television remote control.’”
2. Scenario activity: Ask groups to select a crisis that occurs frequently in the institution (for example, a toy that cannot be shared or a television remote control). Using two puppets, they work as a group to create a scenario in which the crisis is resolved through conversation without becoming aggression.
STEP 4: Calming Down during a Crisis
STEP 4: Calming Down during a Crisis
Note to the trainer: Analyse the 90-Second Rule and the brain states that occur during a crisis (Survival/Emotional Mode) to help prevent staff from constructing catastrophic scenarios. To prevent participants becoming lost in abstract neurological terminology, explain the brain through the metaphor of a two-storey house: a lower floor (primitive/emotional brain) and an upper floor (logical brain).
Method: Case analysis.
Materials: Brain States Model diagram.
Implementation steps:
1. Theoretical explanation: The trainer establishes the crisis situation as follows:
“Dear colleagues, as caregivers, which moments do we find most difficult in practice? The moments when a child has an anger outburst, throws objects, shouts, enters into a power struggle with you or completely rejects the rules, are they not? At such moments we generally think: ‘The child is deliberately not listening to me’, ‘The child is being disrespectful’, or ‘The child is undermining what I say’. At precisely this point, psychology and neuroscience open an important door and tell us: ‘The child is not doing it deliberately at that moment, because the child’s brain is not in logic mode!’
Let us examine step by step the three basic modes in which children’s brains - and indeed our own - operate during crises, and how we should respond to each of these modes:
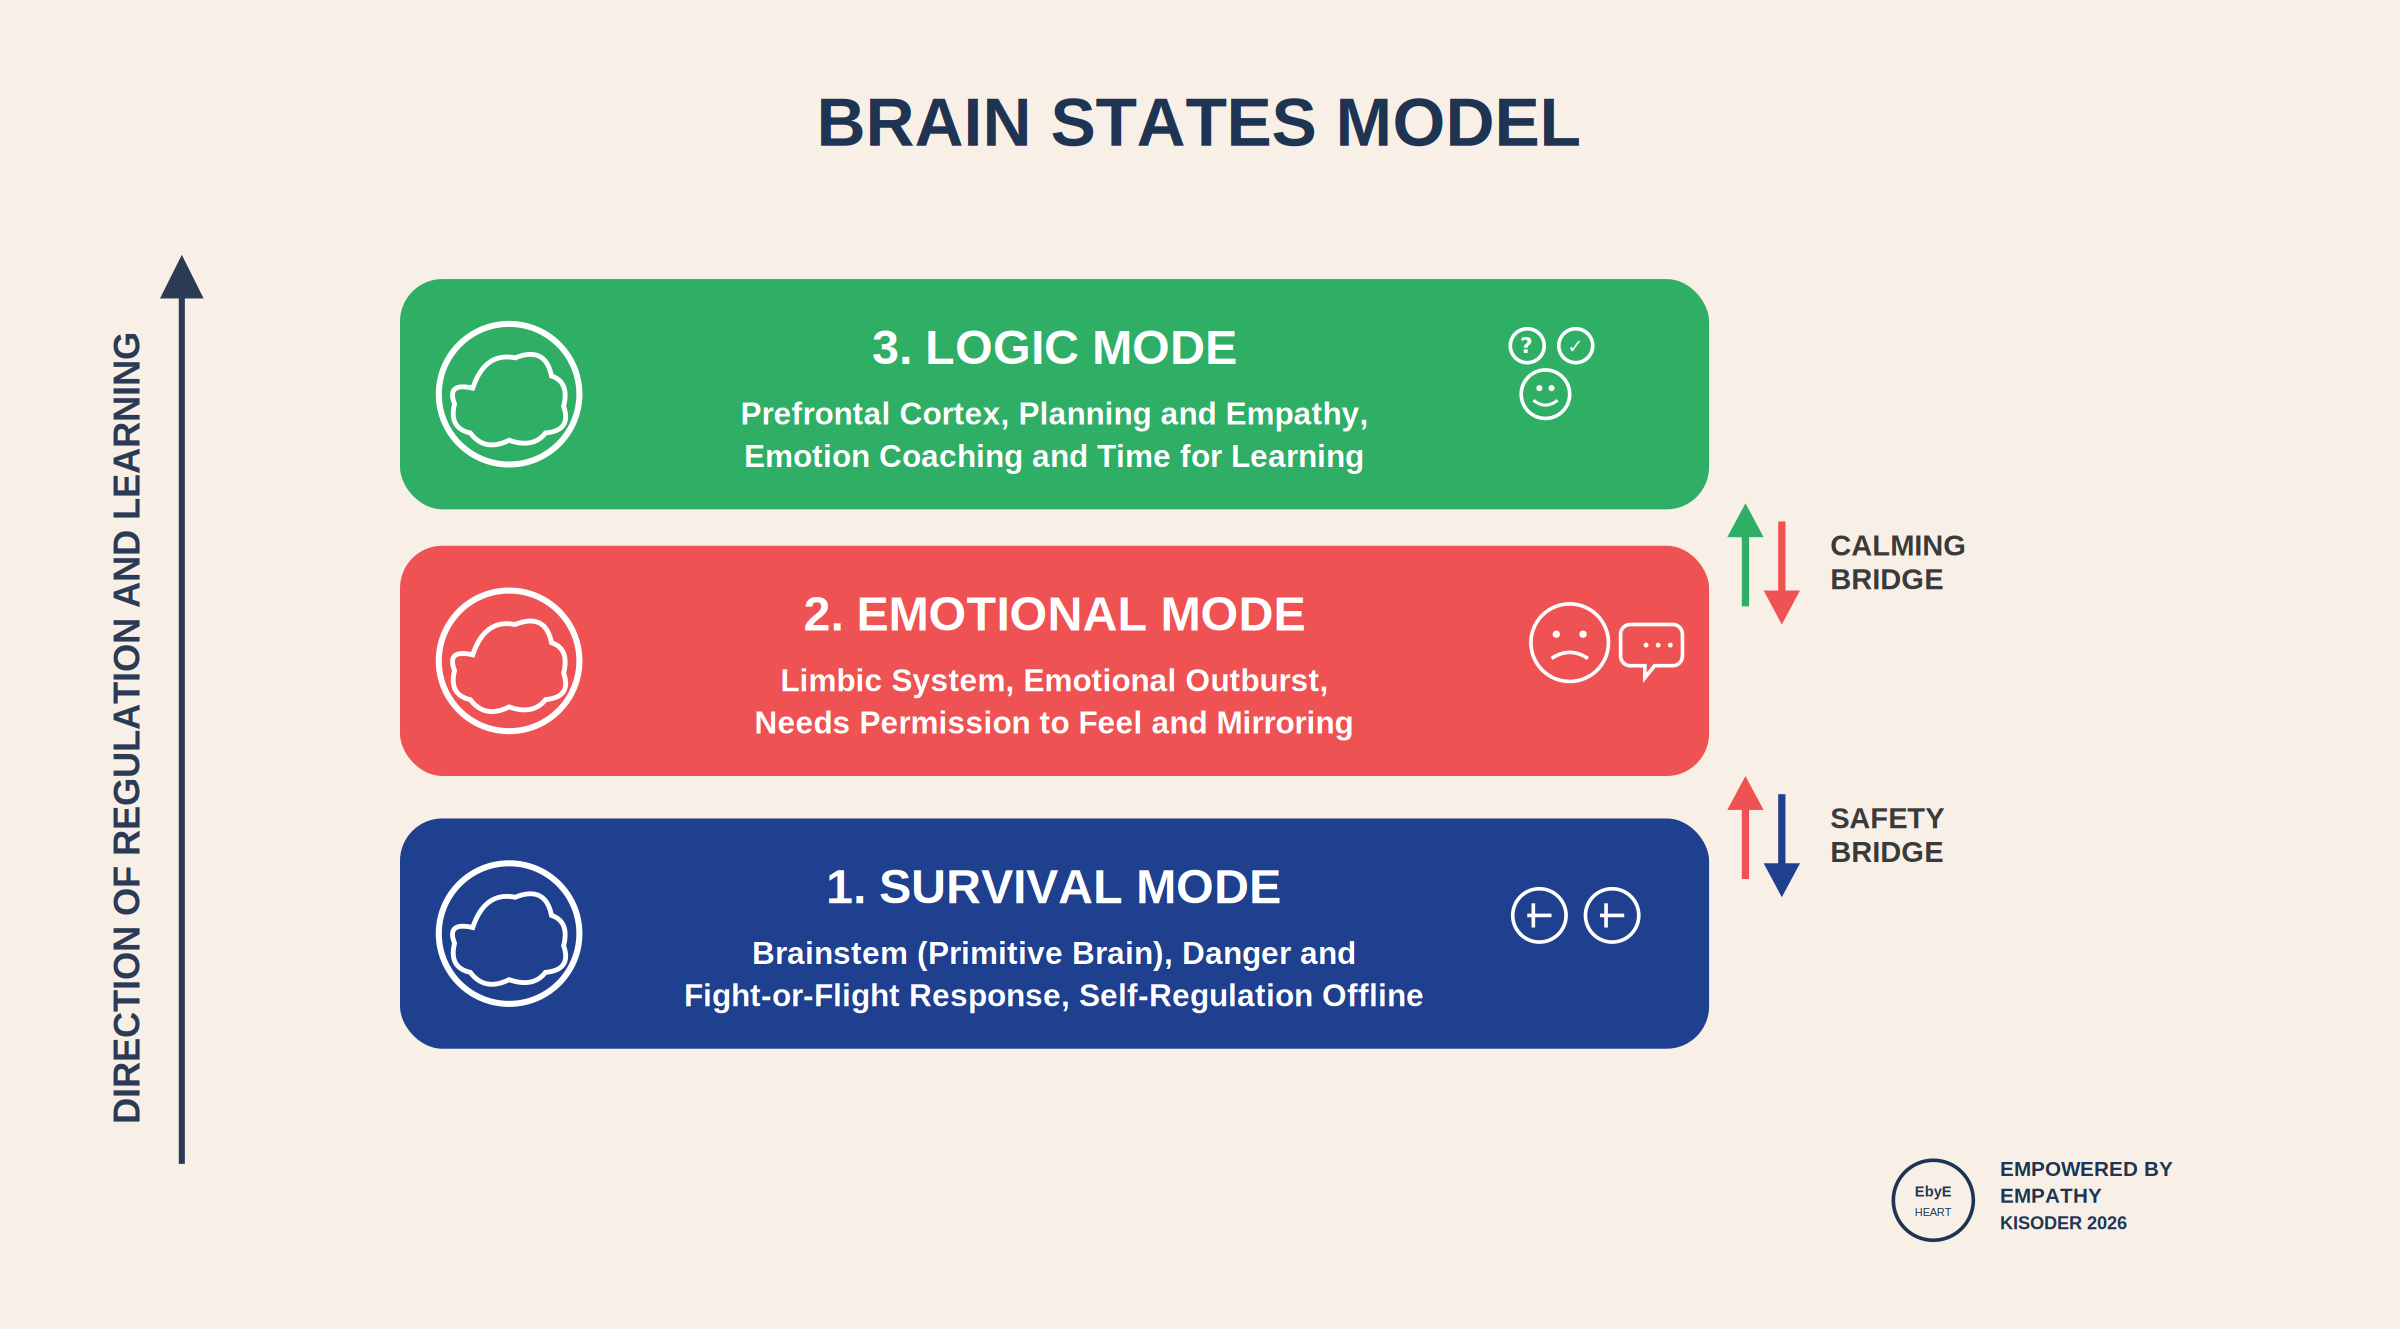
A. Survival Mode (Lower Brain - Brainstem)
Brain equivalent: This is the most primitive, lowest part of our brain. It is responsible only for safety. Like a radar, it constantly scans the surroundings and activates as soon as it detects a threat.
What does the child do during a crisis?: In this mode the child hits, breaks things, throws objects, slams doors, bites, or withdraws completely and runs from the room. Logic is largely offline. At that moment, because of the alarm in the brain, the child sees you not as a caregiver but as a ‘threat’.
The caregiver’s golden strategy: Giving advice, reminding the child of rules or imposing punishment in this mode is like adding fuel to a fire, because at that moment the child’s brain finds it very difficult to hear you. The child has only one need: physical safety. Lower your voice considerably, remain at a safe distance, approach with open palms and communicate through your body: ‘I am here; you are safe.’
B. Emotional Mode (Middle Brain - Limbic System)
Brain equivalent: This is the centre of emotions, memories and relationships. It is where the colours described in the RULER Method are experienced most intensely.
What does the child do in this mode?:The child may not be physically aggressive but may scream, cry excessively, whine or shout. The child’s statements are illogical:
The child constructs catastrophic scenarios such as ‘Everyone hates me!’ or ‘I am the worst child in this institution!’ • The caregiver’s golden strategy: The child’s only need in this mode is to be seen and heard. Do not enter into an argument about who is right or wrong. Use the RULER mirroring technique: ‘You feel very hurt and unfairly treated right now; I hear you.’ As soon as you validate the emotion, the brain begins to move towards the bridge to calmness.
C. Logic Mode (Upper Brain - Prefrontal Cortex)
Brain equivalent: This is the most developed, uppermost part of our brain. Logical thinking, problem-solving, delayed gratification, empathy and compromise all take place here.
What does the child do in this mode?:The child is calm (in the green zone), follows the rules, can use the Turtle Technique, acknowledge a mistake and cooperate with you.
The caregiver’s golden strategy: Emotion coaching takes place precisely in this mode. Solving problems, discussing rules and asking the child, ‘What could you do next time?’ work only when the child is in this mode.
Trainer’s Question and Case Analysis (15 Minutes)
After making this explanation, the trainer asks participants the following key question:
“Colleagues, the greatest trap we fall into in practice is this: when the child is in ‘Survival’ or ‘Emotional’ mode - in other words, downstairs - we try to respond from ‘Logic’ mode - upstairs. When a child is kicking the coffee table in the sitting room and we say, ‘According to the institution’s rules, damaging property is forbidden; you will be punished’, what are we doing? We are shouting down from upstairs to a child who is downstairs. Can the child hear us? No. Now think of a crisis you experienced during yesterday’s shift. In which mode was the child’s brain during that crisis? And from which mode did you approach the child? Let us analyse this through a case.”
2. Self-talk activity: Write a real crisis from an institutional setting (a case) on the board.
Participants analyse how they could move the brain into problem-solving mode during the crisis by saying silently or aloud: “I feel very disappointed right now; I can calm down; this situation will settle after 90 seconds.”
Summary Note for the Trainer:
“According to some researchers, when anger is triggered, the first physiological wave of the emotion may last about 90 seconds. If we do not feed the anger with negative thoughts such as ‘The child never listens to me’, the wave will pass. When the child is in survival mode (hitting/breaking), the child cannot hear us and first needs to feel safe through our calmness. Our rule as caregivers is clear: first Regulate (Calm), then Connect (Understand), and only then Evaluate/Teach (Logic). Trying to teach rules before the child has calmed down and moved upstairs into Logic mode is like trying to teach someone to swim in a stormy sea. We must first bring the child to shore.”
STEP 5: PROTECTING BOUNDARIES
STEP 5: Establishing and Protecting Boundaries
Content: Discuss how boundaries can be clarified during a crisis (safety versus flexibility) within the caregiver’s roles and responsibilities.
Note to the trainer: Ensure that participants do not confuse “compassion” with “lack of boundaries”. Explain that boundaries provide a safe space for the child.
Method: Questions and answers.
Materials: Whiteboard.
Implementation steps:
1. Explaining the golden rule: The trainer presents the philosophy of setting boundaries:
“As caregivers, we should remember two rules during crises: the Power of the Pause and the principle ‘Allow the Emotion, Set a Limit on the Behaviour’. Our basic rule is this: all emotions are normal, but not every behaviour can be permitted.”
2. Questions-and-answers exercise: Ask participants to practise the following pattern:
“I understand that you are very ……….[Emotion] right now, but I cannot allow …………….[Behaviour].” Ask participants to construct sentences using this pattern (for example: “I understand that you are very angry right now, but I cannot allow you to hit your friend.”).
STEP 6: REINFORCEMENT AND CLOSING
STEP 6: End-of-Session Reinforcement and Closing
Note to the trainer: Emphasise how the boundary-setting and play techniques learnt today can increase the child’s capacity for “secure attachment”. Reinforce the difference between being a thermometer that reacts impulsively to events and a thermostat that maintains its internal balance.
Method: Metaphor/anecdotal narration.
Implementation steps:
1. The thermostat metaphor: The trainer reinforces the session using the following words:
“Dear caregivers, throughout this module we have seen that young children cannot calm themselves on their own; they need our calmness. We must stop being thermometers that immediately heat up or cool down according to the environment and become ‘thermostats’ that regulate their own internal temperature despite all the crises in the room. If we remain calm, the child will learn to withdraw into the turtle shell and surf the wave.”
What Does It Mean to Be a Thermometer? (Reactive Approach)
Feature of the device: A thermometer is passive. It measures the temperature of the environment and rises accordingly. If there is a fire outside, the thermometer also shoots into the red zone.
Equivalent in practice: During a crisis, the child’s brain is in Survival or Emotional mode; the child is shouting, throwing objects or slamming doors. If, as a caregiver, you become impatient, raise your voice and flare up with ‘Who do you think you are behaving like that?’, you are responding to the storm in the child’s brain with a storm of your own. This is what it means to be a thermometer. By looking at the child’s red zone, you also move into the red zone.
The result? The crisis in the room doubles, the atmosphere catches fire and both sides enter a power struggle in survival mode.
What Does It Mean to Be a Thermostat? (Co-Regulation / Regulation Together)
Feature of the device: A thermostat is active and has a target. No matter how hot or cold the environment becomes, it works to bring the room to a predetermined ideal temperature (for example, 22 degrees). It is not controlled by the surrounding chaos; it guides the environment.
Equivalent in practice: No matter how intense the child’s crisis in the sitting room, you remember that you are the person setting the ‘weather’ in the room. You remind yourself of the 90-Second Rule and tune your body language to an open and calm position (the Green Zone). While the child is in the red zone, you remain an unwavering green zone. While the child shouts, you consciously lower your voice. This is what it means to be a thermostat. By maintaining your own internal temperature - your calmness - you gradually draw the stormy atmosphere in the room towards your own level, towards calmness.
The Reality that “Young Children Cannot Calm Themselves on Their Own”
Neurological basis: As shown in the preceding diagram, children’s logical brain and self-control mechanisms are not yet developed to the same degree as those of an adult. Expecting a child in crisis to tell themselves, ‘I will stop, breathe and calm down’, is like asking a baby who has not yet learnt to walk to run.
The caregiver’s role: Children learn to calm down not by themselves, but by holding on to our calmness. In psychology this is called co-regulation. When the child hears the steady rhythm of your voice and sees the compassionate yet firm expression in your eyes, the lower brain (the amygdala) gradually calms down. The child receives the message: ‘The adult in front of you is not falling apart; you are safe; you can turn off the alarm.’
Closing statement:
“Dear colleagues, tomorrow, when you begin your shift and hear a scream or the sound of a fight coming from the sitting room or bedrooms, ask yourself this magical question as you quicken your steps: ‘Am I entering this room as a thermometer or as a thermostat?’ If you enter the room as a thermostat and can surf the children’s stormy waves with your own calmness, the child will gradually copy that calmness from you, learn to withdraw into the turtle shell and develop an internal thermostat. Remember: the thing that will calm children’s storms is the unwavering harbour that we offer them.” Ask, “Which of these techniques could change the way you communicate with the child you find most difficult in the institution?” and enable everyone to share how they would apply it.
SESSION 4: EMPATHY
SESSION 4: UNDERSTANDING ANOTHER PERSON - “EMPATHY”

|
Step |
Target outcome (step title) |
Activity |
Method |
Duration |
|---|---|---|---|---|
|
1 |
Defining and recognising empathy |
“Looking through Another Person’s Glasses” |
Interactive presentation |
20 min |
|
2 |
Perspective-taking skills |
“A One-Day Empathy Diary” |
Group work |
20 min |
|
3 |
Practising empathic listening |
“I Am Just Listening” |
Role-play |
25 min |
|
4 |
The difference between empathy and compassion |
Empathy versus Compassion discussion |
Questions and answers |
15 min |
|
5 |
Building a bridge of empathy with the child |
“Why Does the Child Feel This Way?” |
Case analysis |
20 min |
|
6 |
Using empathic language |
“I” language instead of “You” language |
Practice |
15 min |
|
7 |
Evaluation and closing |
Participants’ views |
Oral feedback |
10 min |
STEP 1: ANOTHER PERSON’S PERSPECTIVE
STEP 1: Looking through Another Person’s Glasses
Note to the trainer: Explain that empathy is not only feeling another person’s pain, but also understanding that person’s world from their point of view.
Method: Interactive presentation.
Materials: Whiteboard and coloured spectacle frames (optional).
Implementation steps:
1. Defining empathy: The trainer establishes the concept of empathy in the following words:
“Empathy does not simply mean being polite. It means being able to see what another person is feeling through their eyes and to enter the same emotional frequency without losing our own sense of self. A person who empathises observes the situation clearly from the outside and creates a supportive space by saying, ‘I can see that you are finding this very difficult right now.’ Empathy is like a muscle; it becomes stronger the more it is used and practised.”
2. “Looking through Another Person’s Glasses” discussion: To help participants enter the world of the children in their care in the institution, ask them to imagine setting aside their personal judgements and “adult glasses” and putting on “empathy glasses” that take account of the child’s past trauma and present situation.
“Dear colleagues, when we speak about empathy, we all say, ‘Yes, I already empathise.’ However, while working with children in practice, we unconsciously fall into a major trap: we look at the child through our own parental or adult glasses and completely miss the child’s own glasses. Let us now examine the difference between these two pairs of glasses and the invisible traps we fall into in institutional care:
What Are “Adult Glasses” and Why Can They Mislead Us?
As adults, we have a highly developed logical brain, many years of life experience and an established worldview. When an event occurs, we pass it through our own logical filter.
Equivalent in practice: When a nine-year-old child creates an uproar and cries in the sitting room because a friend has taken the child’s colouring pencil without permission, if we are wearing “adult glasses” we may think: ‘It is only a colouring pencil. We can give the child another one and that will be the end of it. Why cry so much over this? What a difficult child.’ This is the adult perspective. It reads the event only through the pencil’s “material value” and through “logic”.
What Changes When We Put on the “Child’s Glasses (Empathy Glasses)”?
For a moment, we completely silence our own judgements and the adult voice saying, ‘Why make such a big thing of this?’ We consider the child’s developmental stage, disadvantaged background and struggle to find a place in the institution.
Equivalent in practice: Let us now look at the child’s major reaction to the same pencil through “empathy glasses”. This child is under protection, has a damaged sense of belonging and has very few safe spaces that are truly their own. The colouring pencil is not merely a stationery item; it is an enormous symbol of ‘what belongs to me, what is under my control and what represents my boundaries’. When the friend takes the pencil without permission, the child does not feel that only the pencil is being lost; the child feels as though safety, boundaries and rights are being lost. This is the deeper reality shown by the child’s perspective.
STEP 2: A One-Day Empathy Diary
STEP 2: A One-Day Empathy Diary
Note to the trainer: Strengthen participants’ ability to take perspective by helping them view events not through the window of institutional rules, but through the inner world of a disadvantaged child.
Method: Group work.
Materials: Worksheets and pens.
Implementation steps:
1. Starting the activity: The trainer divides the group into teams of four or five people. 2. “A One-Day Empathy Diary” activity: Each group receives the profile of an imaginary child living in the institution (for example, “An eight-year-old child who has recently arrived at the institution, cries constantly in the evenings and does not speak to anyone”). Groups are asked to take the child’s place (take the child’s perspective) and write a short diary page in the child’s voice entitled “My First Day in the Institution”. 3. Sharing: A spokesperson from each group reads the diary. The trainer emphasises how placing oneself in another person’s position (perspective-taking) supports the child’s need to be “seen and understood”.
STEP 3: “I Am Just Listening” Practice
STEP 3: “I Am Just Listening” Practice
Note to the trainer: Enable participants to experience the skill of “listening to understand” the other person, rather than listening in order to answer, advise or judge.
Method: Role-play.
Materials: List of “obstacles to being a good listener” (judging, comparing, immediately giving advice and being distracted).
Implementation steps:
1. “I Am Just Listening” game: Participants form pairs. The first participant begins to describe a real and difficult working day experienced in practice. 2. Role rules: For three minutes, the second participant must never interrupt or give advice, say “that is nothing”, or compare the account with their own memories. They simply listen by maintaining eye contact, nodding and being fully present. The roles are then reversed. 3. Evaluation: The trainer asks: “What did you feel in your body and emotional world when you were simply listened to, without being interrupted or given advice?”
STEP 4: EMPATHY VERSUS PITY
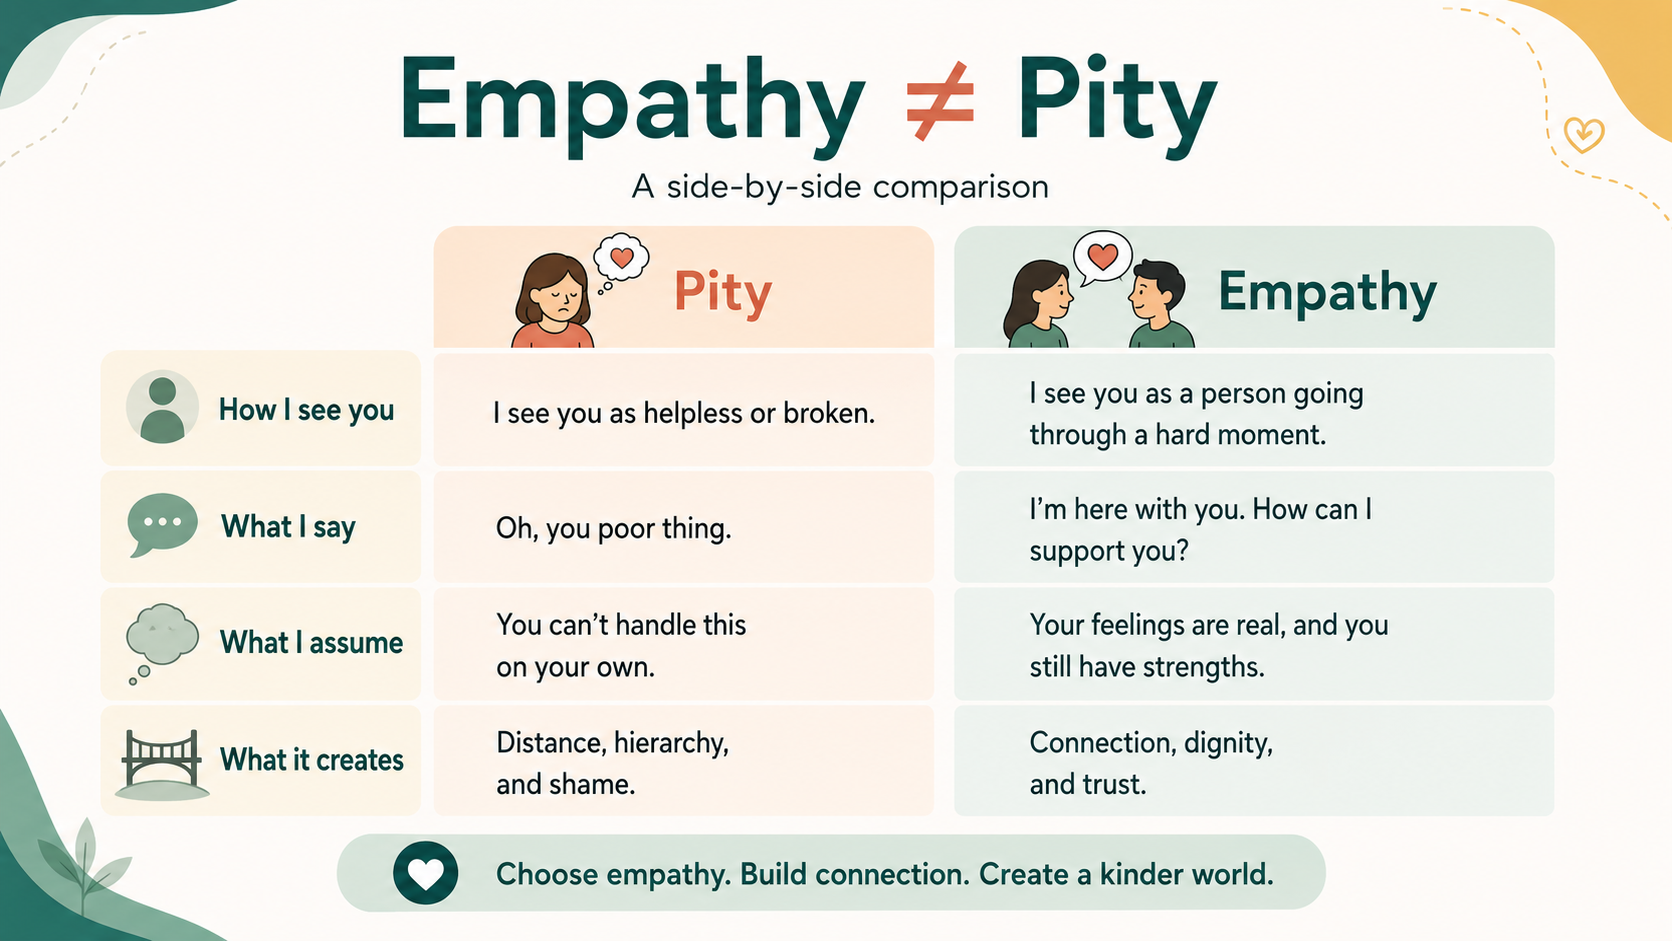
STEP 4: Discussion on “Empathy versus Pity (Sympathy/Compassion)”
Note to the trainer: Ensure that staff can clearly see the critical distinction between “pity (sympathy/compassion)” and “understanding (empathy)”.
Method: Questions and answers and interactive discussion.
Materials: Whiteboard.
Implementation steps:
1. Explaining the critical difference: The trainer writes the two concepts on the board and gives the following explanation:
“Colleagues, the most important distinction that we need to teach our children and practise ourselves is this: pity says, ‘I feel sorry for you’, and looks from a distance, placing space between us. It may create a sense of inferiority in the child. Empathy says, ‘I understand you; I feel this pain or feeling with you’, sits beside the child and forms a connection. We will not pity children; we will sit beside them and build a bridge of empathy so that we can understand them.”
2. Questions and answers: Ask participants: “In terms of the child’s self-confidence, what differences have you observed between approaching a child in the institution with pity and approaching the child with empathic understanding?”
STEP 5: CASE ANALYSIS
STEP 5: “Why Does the Child Feel This Way?” (Case Analysis)
Note to the trainer: Practise the “Three-Step Formula for Understanding the Child” through a case.
Method: Case analysis.
Materials: Case cards.
Implementation steps:
1. Presenting the formula: The trainer explains the three-step formula:
“When building a bridge of empathy with a child, we follow these three steps:
1) Listen to understand, not to answer.
2) Reflect what you have noticed, like a mirror (‘This situation seems to have overwhelmed you’).
3) Acknowledge and validate the child’s emotion (‘It is very normal to feel this way; anyone in your place would feel the same’).” 2. Case analysis: Examine the case of “a child who lost their place in the queue in the dining hall and therefore shouted at a friend”. Participants are asked to analyse step by step how they would approach the child using these three steps.
“Dear colleagues, we are now going to consider a case that you could encounter at any moment in practice. It is very familiar, but contains deep meanings. Please picture it:
Case: Ali is ten years old. He entered the institution six months ago and has a history of serious neglect and anxiety about access to resources (hunger and uncertainty). On this day, his favourite meal is being served in the dining hall. Ali happily joins the queue and waits patiently. Just as his turn arrives, an older child who lives in the same corridor, aged thirteen, lightly pushes Ali with a shoulder and moves in front of him.
Ali freezes for a moment. A few seconds later, his face turns bright red, he clenches his fists and shouts loudly enough for everyone in the dining hall to hear: ‘What are you doing? Everyone is against me; you take everything away from me! I hate you and I hate this institution!’ He then strikes the table hard with the food tray in his hand. Everyone in the dining hall turns and looks at Ali.”
Reading the Case through “Empathy Glasses” (Trainer’s Explanation)
“Colleagues, if we first look at Ali’s enormous reaction through Adult Glasses, what do we see? ‘It was only a queue; he would have received his meal 30 seconds later. What a bad-tempered and difficult child.’ Now let us remove those glasses and put on the Empathy Glasses. Ali experienced neglect in the past; his rights, space and safety were repeatedly violated. The food queue is not simply a queue for Ali; it represents ‘his rights, visibility, effort and justice’. When someone moves in front of him, Ali’s primitive brain (the amygdala) immediately enters Survival/Threat mode and sends the signal: ‘Your rights are being violated again; you are being ignored again; attack to protect yourself!’ Ali’s reaction is not only to that moment, but to the profound sense of injustice created by his past.”
Intervention Analysis Using the “Three-Step Formula for Understanding the Child”
The trainer divides the group into teams of three or four and asks them to practise how a caregiver approaching Ali would manage the crisis according to the formula:
Stage 1: Listen to Understand, Not to Answer
When Ali shouts and strikes the tray, we will not shout from a distance, ‘Calm down, do not shout, wait for your turn’ - we will not be a thermometer. We will immediately approach Ali and lower ourselves to his eye level. While Ali cries out, we will not interrupt him or become defensive by saying, ‘But raising your voice is not right.’ We will simply look into his eyes and, with our full attention, allow him to release the intense emotion.
Stage 2: State What You Have Noticed (Mirroring)
Because Ali’s brain is in the red zone, he cannot see his own feeling. Using the labelling power of RULER, we will reflect his emotion back to him:
“Ali, you are very angry right now and your face has turned bright red. Because the place in the queue that you waited for patiently was taken from you, you feel deeply wronged and ignored. I understand you.”
Stage 3: Acknowledge and Validate the Emotion
Note that we are not approving Ali’s action of striking the tray on the table or shouting; we are validating the profound feeling of injustice that he experienced.
“I know that you have been waiting here for several minutes, Ali. It is very hurtful when someone moves in front of you just as your turn arrives. Anyone in your position would feel deeply wronged and angry. It is very normal to feel this way.”
“Dear caregivers, do you know what will change in Ali’s brain when we apply these three steps? Ali will think, ‘The adult in front of me is not punishing me; this adult understands me; I am here and I am valuable’, and the danger alarm in his brain will gradually turn off. Only after Ali has calmed down and moved into the upper brain - Logic mode - can we proceed to the ‘Boundary and Problem-Solving’ stage:
‘Ali, it is very normal to become angry when you are treated unfairly, but I cannot allow you to strike the tray on the table. Now that you are calm, shall we go together to speak to the other child and assert your rights using the Fox or Owl strategy and “I” language?’
Now I ask you: are there children in your institution who, like Ali, enter the red zone in a struggle over resources or rights? What do you imagine would change in the situation if you approached them using these three steps from today onwards?”
STEP 6: “I” LANGUAGE
STEP 6: “I” Language instead of “You” Language
Note to the trainer: Present the difference between “You” language and “I” language as a tool of assertiveness that does not blame the other person and takes responsibility for the emotion.
Method: Practice and sentence-conversion exercise.
Materials: Whiteboard.
Implementation steps:
1. Theoretical basis: The trainer explains the logic of empathic language:
“Accusatory statements that we frequently use during conflict, such as ‘You never listen to me!’ or ‘You are so selfish!’ - “You” language - immediately make the other person defensive and break communication. Using “I” language instead enables the individual to take responsibility for their own emotions and thoughts without blaming another person.”
2. “From You to I” conversion game: Write accusatory sentences on the board and ask participants to convert them into “I” language:
o “You” language: “You always leave your room in such a mess; I have had enough!” o “I” language: “When the room is untidy, I feel very tired and I need us to cooperate in keeping it organised.”
STEP 7: Reinforcement and Closing
STEP 7: Reinforcement and Closing
Note to the trainer: Obtain clear commitments from participants about how they will use the empathic listening and reflection tools they have acquired in practice tomorrow. Close the session by emphasising that empathy is the strongest “invisible bond” between caregiver and child.
Method: Oral feedback.
“Today we discussed the striking difference between pity (sympathy) and understanding (empathy). We saw that pity creates distance, while empathy sits beside the person and forms a connection. What difference do you think this awareness will make in your daily and working lives?”
SESSION 5: SOCIAL SKILLS
SESSION 5: SOCIAL SKILLS AND CONFLICT RESOLUTION
|
Step |
Target outcome (step title) |
Activity |
Method |
Duration |
|---|---|---|---|---|
|
1 |
Establishing boundaries in social relationships |
“Friendship Circle” analysis |
Interactive presentation |
20 min |
|
2 |
Turning conflict into an opportunity |
“Win-Win” model |
Role-play |
25 min |
|
3 |
Problem-solving skills |
“Think-Speak-Listen” chain |
Group work |
20 min |
|
4 |
Strengthening cooperation in communication |
“Team Game” simulation |
Practical game |
20 min |
|
5 |
Reading social cues |
“What Do You Think the Other Person Is Thinking?” |
Case analysis |
15 min |
|
6 |
Supporting social skills |
Social practice in daily life |
Questions and answers |
10 min |
|
7 |
End-of-session reinforcement |
Review of key concepts |
Metaphor/anecdote |
10 min |
|
8 |
Evaluation and closing |
Participants’ views |
Oral feedback |
5 min |
STEP 1: SOCIAL BOUNDARIES
STEP 1: Establishing Boundaries in Social Relationships
Note to the trainer: Help participants understand that children’s social skills are the way in which they project their internal emotional world into the outside world. Emphasise the role of being a good listener in maintaining social boundaries.
Method: Interactive presentation.
Materials: Whiteboard.
Implementation steps:
1. Establishing the foundation of social skills: The trainer presents the concept in the following words:
“Dear colleagues, social skills are the way in which a person who understands their own feelings and can empathise with others reflects these qualities into the outside world. These skills enable people to get along with others, work together and resolve disagreements without turning them into fights. The most fundamental rule is to be a good listener. People who can listen without interrupting the other person, without constantly talking about themselves and without judging can understand what others feel and communicate in a much healthier way.”
2. “Friendship Circle” analysis: Draw three concentric circles on the board (innermost: Me and My Close Circle; middle: My Friends; outermost: Strangers/Social Environment). Ask participants to discuss the confusion experienced by children in the institution when moving between these circles: how close they should become to different people and how they should protect their physical and emotional boundaries.
“Dear colleagues, these three circles drawn on the board are in fact an ‘Emotional and Physical Boundary Map’ that helps a child feel safe in social life. Children who grow up with their families naturally learn which emotions and behaviours to show to people in each circle by observing their parents in the flow of daily life. For example, they hug their mother in the innermost circle, share a toy with a friend in the middle circle and keep a distance from a stranger in the outermost circle.
However, in the world of children in institutional care, children who are disadvantaged, or children with a history of early neglect or abuse, the boundaries between these circles may be completely disorganised.
A new visitor, unfamiliar member of staff or vocational instructor arrives at the institution or children’s home. You may see some children approach this ‘stranger’, who should be in the outermost circle, within seconds as if the person were a mother or father in the innermost circle, jumping into the person’s arms and showing excessive affection.
An outside observer may say, ‘What a warm and affectionate child.’ However, this situation results from the child’s lack of secure attachment and lack of knowledge about the boundaries between circles. This analysis leads to an important awareness: if a child treats someone in the outermost circle as though they belonged to the innermost circle, that child is extremely vulnerable to abuse and manipulation in social life. We need to recognise this confusion about boundaries and guide children regarding ‘whom to trust, how much and in what way’. In which situations do you most often observe this confusion about boundaries in your practice?”
STEP 2: CONFLICT AS OPPORTUNITY
STEP 2: Turning Conflict into an Opportunity
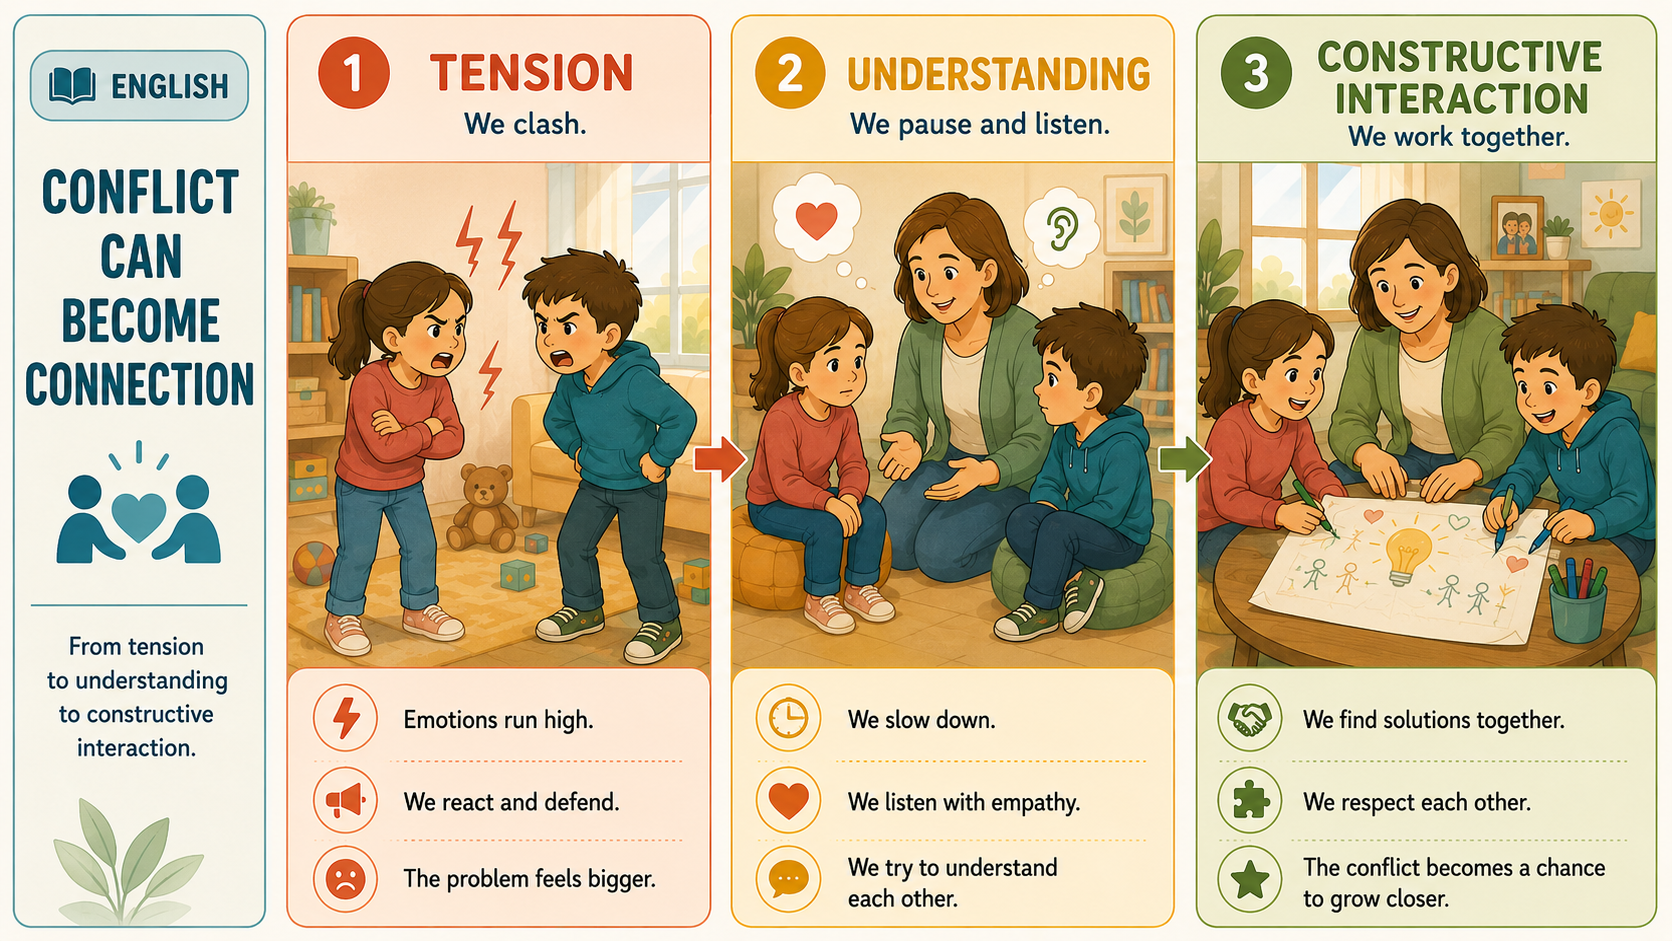
Note to the trainer: Emphasise the five basic strategies used in interpersonal conflict (the Five Animal Metaphors). Support participants in becoming guides who direct children towards the Fox and Owl strategies rather than acting as “referees”. Present conflict not as “destruction” but as a “learning opportunity”.
Method: Role-play.
Materials: Five animal illustrations (Turtle, Teddy Bear, Shark, Fox and Owl).
Implementation steps:
1. Explaining the Five Animal Strategies: The trainer explains the strategies using metaphors:
“Colleagues, during conflict there are five different ways of finding a solution that children - and adults - may follow. We can teach them very easily using animal symbols:
Turtle (Withdrawal):Remains silent to avoid tension and refrains from defending personal rights.
Teddy Bear (Giving In):Completely ignores personal needs so that other people will not be hurt.
Shark (Forcing):Focuses only on personal goals and tries to win by applying pressure.
Fox (Compromise):Is willing to make mutual concessions and meet at a shared middle point (‘I will play for a while, then you can play’).
Owl (Collaboration): Reaches the root of the problem and finds a constructive way that fully meets the needs of both parties.”
2. Role-play practice: Participants form pairs. Using a crisis that frequently occurs in the institution (for example, a dispute over whose turn it is to use a computer), they take turns acting out the “Shark” style (pressuring) and then the “Fox/Owl” styles (compromising/collaborative), so that they experience the difference.
STEP 3: Problem-Solving Skills
STEP 3: Problem-Solving Skills
Note to the trainer: Help participants internalise the “Think-Speak-Listen” steps, which enable children to generate their own solutions, rather than becoming judges who solve problems on the child’s behalf.
Method: Small-group work.
Materials: Worksheets and “Create a Solution, Use It!” scenario cards.
Implementation steps:
1. The role of the parent/caregiver: The trainer presents the basic principle from the guide:
“When a child experiences a problem, instead of solving it on the child’s behalf or becoming a judge who decides who is right, we should ask which animal strategy the child is using and guide the child towards a solution. Our aim is to help children use the Fox or Owl strategies according to the situation, rather than becoming a Turtle or a Shark.”
2. “Think-Speak-Listen” chain activity: Give each group a problem scenario.
Participants structure intervention steps that help children first pause and think about an appropriate strategy during a crisis, then speak constructively with the other party and finally listen to the other party’s need.
Distribution of scenarios: Divide participants into groups of three or four. Give each group one of the following scenarios:
Scenario 1:Two children want to use the same computer. Both say, “I was here first”, and the argument grows.
Scenario 2:One child takes another child’s property without permission, and the other shouts angrily, “Thief!”
Scenario 3:During a group game, one child does not follow the rules and the others want to exclude the child from the game.
THINK (Pause and Evaluate): The caregiver does not immediately provide a solution for children who are fighting.
First invite both children to calm down and ask the following questions in sequence:
“What are you feeling right now? Say it in one word.” (Naming the emotion)
“What exactly happened? Tell me.” (Describing the event from the child’s own perspective)
“What did you want?” (Clarifying the need)
These questions move the child’s brain out of “reaction mode” and into “thinking mode”. At this stage the caregiver does not judge, but simply listens and guides.
SPEAK (Constructive Expression): Ask the child to explain the problem to the other person using the “I” language that has been learnt. If necessary, the caregiver can begin with the following pattern:
“Can you explain this using ‘I’ language? Instead of saying ‘You always...’, begin with ‘I felt... because...’.”
The caregiver does not interrupt while the child speaks. When the child has finished, ask which animal strategy was used:
“Which animal did you act like just now? A Shark, a Turtle or another animal?”
LISTEN (Understanding the Other Party): It is now the other child’s turn. Ask this child to use the same “I” language format and ask the first child simply to listen, without interrupting or objecting. When the process is complete, ask both children:
“What was the other person feeling? What did that person need?”
This question requires the child to take perspective - in other words, to empathise. The caregiver writes the needs of both parties on a board or paper and asks:
“Can both of your needs be met? Which solution would work for both of you? The Fox or the Owl?”
Large-group sharing: Each group briefly shares its scenario and the solution it found. The trainer deepens the discussion with the following question:
“Which is the most difficult link in this chain in real life: Think, Speak or Listen? Why?”
STEP 4: COOPERATION IN COMMUNICATION
STEP 4: Strengthening Cooperation in Communication
Note to the trainer: This step is a completely practical game. Enable participants to experience directly how one-way listening without feedback or interaction breaks communication.
Method: Practical game.
Materials: One blank sheet of A4 paper for each participant.
Implementation steps:
1. “Paper Tearing” game: The trainer gives each participant an A4 sheet of paper and asks everyone to close their eyes. The trainer sets the rule: “Asking questions, speaking and opening your eyes are strictly forbidden.” 2. Giving instructions: The trainer gives the following commands in sequence:
“Fold the paper in half... Tear off the top-left corner... Fold the paper in half again... Tear off the bottom-left corner...”
3. Evaluation: When participants open their eyes, they see that the papers have been torn in completely different ways. The trainer emphasises: “As you can see, one-way listening without feedback such as mutual interaction, asking questions and eye contact completely disrupts communication. When communicating with children, we also need interaction to ensure that they have understood us correctly.”
STEP 5: Reading Social Cues
STEP 5: Reading Social Cues
Note to the trainer: Help participants recognise that disadvantaged children and children with a history of trauma may have neurologically very low “threat-perception” thresholds. Guide them to interpret the child’s aggression not as “bad manners”, but as a false alarm from the brain.
Method: Case analysis and interactive discussion.
Materials: Whiteboard and Brain States Model diagram.
Implementation steps:
1. Analysis of social cues
“Dear colleagues, social skills are not limited to waiting for our turn, using ‘I’ language or defending our rights. A very large part of social skills is the ability to interpret correctly the invisible social signals and cues in the environment. As adults, when we enter a setting, we roughly understand what is happening through people’s gestures, facial expressions, tone of voice or whispering. However, this mechanism for reading social cues may be insufficient in the world of disadvantaged children who are under protection or who experienced neglect or violence at an early age. Because of a neurological filter, they may interpret even neutral or ambiguous signals directly as an ‘attack’ or ‘exclusion’.”
2. Presentation and in-depth analysis of the case
The trainer presents the case scenario from the handbook to the group and then begins a two-stage analysis:
Case: Can is eleven years old and is sitting in the television room. Two of his friends, Mert and Efe, are sitting on a sofa in the other corner of the room. They suddenly begin laughing while whispering quietly to one another. Can is not looking at them, but as soon as he hears the laughter, he jumps up and moves towards Mert and Efe. Clenching his fists, he shouts, ‘What are you saying behind my back? What right do you have to make fun of me?’ and throws the magazines from the coffee table towards them (Shark Strategy). In fact, Mert and Efe are speaking about a funny video they watched the previous evening, entirely unrelated to Can.
Progressive question: What Are the Neurological Reasons Why the Child Misinterprets This Social Cue?
The trainer draws participants’ attention to the Brain States Model covered in the previous module:
Chronic alarm state (hypervigilance): In the brains of children who have experienced trauma, neglect or unsafe environments, the amygdala (the alarm centre) operates continuously at the highest level. They are like a house with an excessively sensitive alarm because of the fear that a burglar may enter at any moment; the alarm sounds even when the wind blows.
Perceiving uncertainty as a threat: The whispering and laughter in the room are an “ambiguous social cue” for Can. While a healthy brain may reason, ‘I wonder what they are laughing about?’ (Logic Mode), Can’s alarm system immediately codes this uncertainty as a serious danger, an attack of exclusion or humiliation. Within seconds, the child falls into Survival Mode (the Lower Brain). The aggression (Shark Strategy) does not actually result from disrespect, but from the brain giving the command: ‘You are under attack; hit immediately to protect yourself!’
3. How Do We Teach a Child to “Read Social Cues Correctly” in Practice?
The trainer gathers participants’ suggestions through brainstorming and structures the following Three-Stage Guidance Model on the board so that caregivers can teach these cues to children such as Can:
Stage 1: First Turn Off the Alarm (Co-Regulation)
When the child is in the middle of a crisis and attacking friends, saying, ‘They were not making fun of you; you misunderstood’, will not work. First approach Can, lower yourself to his level from a safe distance and say in a calm tone, ‘Can, I am here; I am beside you. Let us take a deep breath; first you can calm down a little’, helping the child to move out of Survival Mode.
Stage 2: Examine the Social Cue (Detective Game)
When the child has calmed down and moved into the Upper Brain (Logic Mode), analyse the clues together like a crime-scene detective:
“Can, I understand that you became very angry when you heard two friends whispering and laughing in the room because you thought they were speaking about you. But did you have clear evidence that they were speaking about you? You only heard their voices, did you not? What percentage chance do you think there was that they were laughing at something completely unrelated to you? Let us investigate this like detectives.”
Stage 3: Teach the Child to Ask an “Owl Question” instead of Acting like a Shark
As a behavioural rehearsal, teach the child that when a similar ambiguous cue appears again, instead of attacking (being a Shark) or becoming offended and leaving (being a Turtle), the child can ask a question like an Owl or Fox to check the situation:
“Can, the next time someone whispers and laughs and that unpleasant feeling appears inside you, would you like to try asking directly, instead of going over and hitting them: ‘Are you laughing at something funny? May I join you?’ That is Owl behaviour. If you go and ask, you will use your own eyes to cancel the false alarm that your brain is giving you.”
Closing emphasis for the trainer
“Dear caregivers, a child in Can’s situation taking every whisper personally is not a personality disorder. Past wounds have caused these children to see the world as a dangerous place. Through our patient detective guidance, we will teach them that they do not need to remain constantly alert and that they can examine signals in the environment through an Owl’s eyes instead of immediately biting with Shark’s teeth.”
STEP 6: DAILY SOCIAL SKILLS
STEP 6: Bringing Social Skills into Daily Life
Note to the trainer: This step is entirely focused on field practice. Help participants recognise that daily routines in the institution are laboratories for social skills. Emphasise that social skills develop not through reading books, but by living, repeating and making mistakes in a safe environment.
Method: Questions and answers and brainstorming.
Materials: Whiteboard and notepaper.
Implementation steps:
Establishing the concept: The trainer first presents the basic principle:
“Dear colleagues, so far we have discussed listening to children properly, using empathy, turning conflict into an opportunity and reading social cues. How do all these skills become established in children’s minds? The answer is simple: repetition, repetition and repetition. Social skills are like muscles: they weaken when they are not used and become stronger through small exercises every day. Every shared meal, every division of tasks and every group game in your institution is in fact an opportunity for social-skills exercise.”
Daily practice opportunities: The trainer writes “Social Skills Laboratory in the Institution” on the board and invites participants to contribute through brainstorming. The following patterns are then shared: preparing a meal together - children divide tasks, wait for their turn, ask for help and say thank you; cleaning a room - they negotiate and practise resolving disagreements; group games - skills in setting rules, objecting and reaching compromise develop naturally; listening circle - every evening everyone shares the best and most difficult moment of the day, while the caregiver only listens and does not comment.
“My Social Compass” card: Suggest the following practical activity: once a week in the institution, sit individually with each child and ask three questions: ‘Do you remember who helped you this week?’ ‘Did you upset anyone this week; did you notice?’ ‘Is there anything you would like to do differently next time?’ These three questions quietly but powerfully develop the child’s social awareness and self-evaluation skills.
Closing question: The trainer closes the step by asking: “Which of your institution’s daily routines could you turn into a conscious social-skills practice using what we have learnt today? Ask two people in each group to share.”
STEP 7: End-of-Session Reinforcement
STEP 7: End-of-Session Reinforcement
Note for the trainer: This is a cognitive reinforcement step. Help participants make the day’s key concepts concrete in their minds. Use metaphors and anecdotes so that the concepts are retained in emotional memory; abstract concepts are learnt much more permanently through concrete images.
Method: Metaphor and anecdote.
Materials: Whiteboard.
Implementation steps:
Summary of key concepts: The trainer writes the five main concepts of the day on the board and explains each in one sentence: Social skills — the bridge that enables us to carry our emotions into the outside world in a healthy way. Friendship Circle — a child who knows whom to trust and to what extent is protected against abuse. Five Animal Strategies — knowing which animal we are acting like during conflict is a strength in itself. Paper Tearing — communication without interaction is like giving directions on a map without knowing where the other person is. Social cues — a child’s aggression is often a false alarm.
The “Shield” metaphor: The trainer uses the following image:
“Colleagues, think of social skills in this way: a child holds an invisible shield. This shield does not protect the child from punches or words — it protects the child from loneliness. Being able to form a safe friendship, prevent conflict from turning into a fight, say ‘no’ and ask for help — each of these strengthens the shield a little more. When you teach these skills to children, you are giving them a strong shield.”
Linking question: The trainer connects this session with the previous one: “Last week we worked on empathy. Empathy was the child opening a window onto another person’s world. This week we worked on social skills — taking a step through that window. Through empathy we understand another person’s inner world; through social skills, in a crisis we can reach agreement like an Owl rather than becoming a Shark. When these two tools come together, we build safe cooperation.”
STEP 8: Evaluation and closing
STEP 8: Evaluation and closing
Note for the trainer: This step closes both the session and Chapter 5. Receiving participants’ oral feedback provides valuable information for you and is also a powerful learning experience for them, because explaining what they have learnt to someone else is one of the strongest ways of internalising it.
Method: Oral feedback and closing circle.
Materials: None (circle seating only).
Implementation steps:
Closing circle: Participants form a circle. The trainer begins the round and asks each participant to answer the following two questions in turn: ‘Which concept stayed with me most today?’ and ‘When I return to the institution tomorrow, what is one thing I will do differently with a child in relation to social skills?’
Closing remarks: The trainer concludes the session as follows:
“Dear colleagues, today we discovered something very important together: teaching social skills is even more valuable than teaching a child to fish. A child who learns to fish can feed themselves; a child who learns social skills grows up without being alone and with a sense of belonging. We know that the deepest wound of children in institutional care is precisely the feeling ‘I do not belong’. When you take these tools into practice, you place a layer of healing over that feeling. In next week’s session, we will work on the strongest component of these skills: assertiveness — that is, helping the child find their own voice. Thank you all very much for today.”
SESSION 6: ASSERTIVENESS
SESSION 6: ASSERTIVENESS SKILLS — EXPRESSING YOURSELF AND DEFENDING YOUR RIGHTS

|
Step |
Learning outcome (step title) |
Activity |
Method |
Duration |
|---|---|---|---|---|
|
1 |
Distinguishing passive, aggressive and assertive behaviour |
Behaviour Triangle analysis |
Interactive presentation |
20 min |
|
2 |
Expressing emotions using “I” language |
“I” statements instead of “you” statements |
Role-play |
25 min |
|
3 |
Setting boundaries and being able to say “No” |
Practising a “Polite No” |
Practical activity |
20 min |
|
4 |
Defending oneself against violations of rights |
Maintaining a safe distance |
Case analysis |
20 min |
|
5 |
Using body language and tone of voice |
“Stand Tall, Speak Firmly” |
Physical activity |
15 min |
|
6 |
Supporting social skills |
Practising assertiveness in daily life |
Questions and answers |
10 min |
|
7 |
End-of-session reinforcement |
Review of key concepts |
Metaphor/anecdote |
10 min |
|
8 |
Evaluation and closing |
Participants’ views |
Oral feedback |
5 min |
STEP 1: BEHAVIOUR STYLES
STEP 1: Distinguishing passive, aggressive and assertive behaviour
Note for the trainer: Explain the differences between passive behaviour (remaining silent), aggressive behaviour (shouting/attacking) and assertive behaviour (expressing oneself clearly and respectfully). Prevent participants from confusing assertiveness with aggressiveness. Emphasise clearly that assertiveness means both protecting one’s own rights and respecting the other person’s boundaries.
Method: Interactive presentation and enactment.
Materials: Whiteboard and cards representing four different communication styles.
Implementation steps:
“Dear colleagues, in the final module of our training we are working on emotional intelligence’s strongest shield in the outside world: assertiveness. In daily life, especially in intensive relationships within an institution, we respond to events through four main communication styles:
Passive style (I am unimportant; you are important): The person cannot state their own needs or rights. They cannot say no. They suppress their feelings and allow their boundaries to be disregarded.
Aggressive style (Only I am important; you are unimportant): When defending their rights, the person shouts, accuses and threatens, and overrides the other person’s boundaries (the Shark strategy).
Passive-aggressive style (I will not say it directly, but I will make you pay): The person smiles to your face but acts behind your back, makes insinuations, slams doors and sulks.
Assertive style (I am important, and you are important): The person expresses their rights, feelings and needs clearly and firmly without hurting or blaming the other person. This is the ideal balance that we want to develop in ourselves and foster in children.” The communication style that we display during a crisis in daily life — shouting, sulking or setting a clear boundary — is only the visible part of the iceberg: the ‘behaviour’. In psychology, however, we know that no behaviour is without a cause. Behind every behaviour lies an emotion, and behind that emotion lies a thought produced by the mind. These three elements form an inseparable triangle:
[ BEHAVIOUR TRIANGLE ]
THOUGHT
EMOTION BEHAVIOUR
Let us now analyse the passive, aggressive and assertive communication styles that we often see in the institution by placing them within this Behaviour Triangle. You will see that it is not possible to change a style without changing the underlying thought:
1. Aggressive Style Triangle (Shark)
Thought: “If I do not raise my voice, they will walk all over me; no one will listen to me. I must attack in order to prove that I am right.”
Emotion in the body: Feeling threatened, intense anger and ambition to win.
Outward behaviour: Interrupting the other person, accusing, pointing a finger, shouting or throwing objects.
2. Passive Style Triangle (Turtle)
Thought: “If I say no, they will not like me and I will be excluded. To avoid creating a problem, I must give up what I want.”
Emotion in the body: Fear of rejection, intense anxiety and a sense of worthlessness.
Outward behaviour: Remaining silent, being unable to defend one’s rights, shrinking back, being unable to say no and continually giving way.
3. Assertive Style Triangle (Owl/Fox)
Thought: “My rights and needs are valuable, and so are the rights of the person in front of me. I can express myself clearly without blaming the other person.”
Emotion in the body: Inner confidence, calmness, self-respect and respect for the other person.
Outward behaviour: Upright posture, a clear tone of voice, setting boundaries using “I” language, and protecting both oneself and the other person.
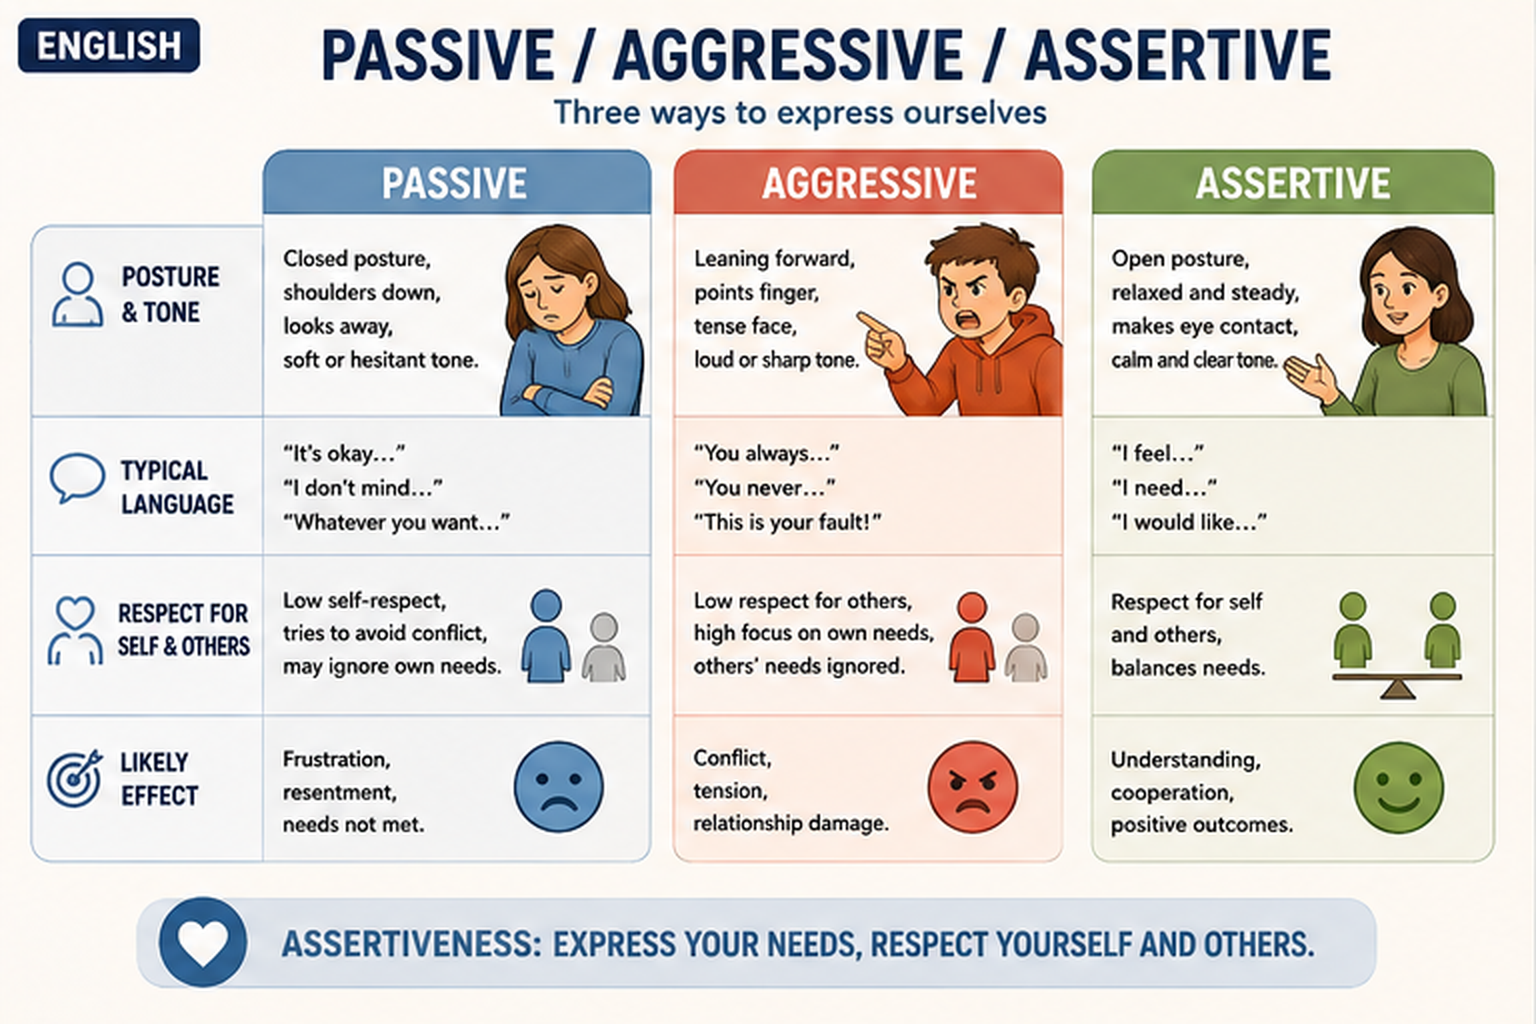
Activity: Classroom Behaviour Triangle Practice (10 minutes)
The trainer draws a very large triangle on the board and writes Thought — Emotion — Behaviour at its three corners. The trainer then gives participants the following case scenario from practice:
Scenario: “You are working the evening shift at the institution. You are very tired and, just as you are about to take a break, a colleague approaches you and says in a commanding tone, ‘Go and check that child’s room immediately; I have an urgent matter outside’, then walks away without waiting for an answer.”
The trainer invites the group to an interactive discussion:
“Dear colleagues, in response to this situation: If we unthinkingly activate the Aggressive Triangle, what thought will pass through our mind? What emotion will erupt within us, and what kind of ‘behaviour’ will we display towards our colleague? (Elicit responses such as the thought ‘They think I am a servant’, the emotion ‘Anger’, and the behaviour ‘Go and do it yourself!’.)
What happens if we activate the Passive Triangle? (Elicit responses such as the thought ‘I should not be rude’, the emotion ‘Hurt’, and the behaviour of checking the room while complaining under one’s breath.)
Our aim is to avoid both of these traps. How can we construct the Assertive Triangle in this situation? What healthy thought should we place in our mind so that our body can remain calm and we can set a clear boundary with our colleague without causing harm, but also without allowing ourselves to be disregarded?”
After receiving the responses, continue as follows:
“Excellent ideas have emerged. Let us now build together the Assertive Triangle that enables us to protect ourselves and maintain the professional relationship in this difficult situation, and write each part in its place on the board:
Corner 1: Healthy THOUGHT (mental adjustment)
To avoid falling into the traps of passivity — ‘It would be rude’ — or aggression — ‘They are trying to walk all over me’ — the assertive thought we need to place in our mind is precisely this:
“My colleague may have an urgent situation, and that is understandable; however, after a very tiring shift I also have the right to rest and to finish my shift as planned. Protecting my boundary does not mean that I am attacking my colleague or refusing to cooperate.”
Corner 2: EMOTION in the body (inner state)
The moment we place this healthy thought in our mind, the cry of the amygdala — our primitive brain — saying ‘You are under threat!’ stops. The upper brain becomes active. The emotion that emerges in the body is no longer anger or fear, but inner calmness, determination and self-respect. Our pulse does not race and our voice does not tremble.
Corner 3: Outward BEHAVIOUR (assertive boundary statement)
We have calmed down and are aware of our rights. Now we need to stop the colleague who has turned away, using firm body language — making eye contact and standing upright — without biting like a Shark or grumbling behind their back like a Turtle, and make the following Assertive Statement:
Assertive statement: “Ayşe, please wait a moment. I hear and understand that you have an urgent matter. However, I have just completed a very busy and tiring shift, my working hours are over and I need to leave immediately. For that reason, I cannot check the room. If you wish, we can inform the colleague currently on duty or our supervisor together. What do you think?”
Closing emphasis for the trainer
“In this way, we did not say ‘Yes’ to our colleague’s request and allow ourselves to be disregarded; but neither did we shout at the colleague and place ourselves in the wrong when we were in the right. We simply stood firmly and clearly behind our own boundary. This is the Assertiveness Triangle. The more we use assertiveness among ourselves and with children, the more the children in the institution will copy this clear and firm stance from us when defending their rights, instead of shouting aggressively or withdrawing passively. Through this triangle, we stop viewing children’s irritable behaviour or withdrawal simply as ‘misbehaviour’. Remember: if you want to change a child’s irritable behaviour, you must first reach the other corners of the triangle — the emotion in the child’s heart and the traumatic thought in the child’s mind — through the ‘Empathy Glasses’.”
STEP 2: “I” LANGUAGE
STEP 2: Expressing emotions using “I” language
Note for the trainer: “I” language is the cornerstone of assertiveness. Emphasise the transformative power of saying “When I am hit, it hurts and I feel upset” rather than “You make me angry”. Enable participants to practise reflecting emotions and defending rights through a concrete formula.
Method: Role-play.
Materials: Cards for converting “you” language into “I” language.
Implementation steps:
Presenting the formula: The trainer writes the assertive self-expression formula on the board:
When [event] happens + I feel [feeling/emotion] + Because I need [need] + Therefore I expect/set the following boundary [expectation/boundary].
Role-play exercise: Participants work in pairs. One person plays the role of someone who breaks a rule; the other person responds with an “I” statement that follows the formula instead of using accusatory “you” language:
“When I see that the room has not been cleaned at the shift handover, I feel frustrated because I need a fair division of work. Therefore, I expect you to follow the cleaning plan during the next shift.”
STEP 3: BOUNDARIES AND SAYING NO
STEP 3: Setting boundaries and being able to say “No”
Note for the trainer: Because of their role as a “compassionate caregiver”, participants may become excessively permissive or passive towards children.
Help them recognise that boundaries are also protective for the child.
Method: Practical activity.
Materials: Boundary-setting scenarios.
Implementation steps:
The principle of a polite “No”: The trainer explains that saying no is not an attack on the other person; it is a statement of one’s own boundaries.
Activity: Participants practise, in writing and orally, how to say no with calm but unwavering clarity when children insist on bending rules — for example, wanting to use a telephone after bedtime:
“I hear you and understand that you want to play, but it is bedtime now, so I cannot allow the telephone. You may use it again tomorrow during free time.”
STEP 4: DEFENDING RIGHTS
STEP 4: Defending oneself against violations of rights
Note for the trainer: Help participants recognise that saying “No” to imposed or boundary-crossing requests from friends, neighbours or acquaintances in daily life is not quarrelsome behaviour; it is an assertiveness skill that protects their mental well-being.
Method: Metaphorical explanation and case analysis.
Materials: Whiteboard and case examples from daily life.
Implementation steps:
Thermostat metaphor for maintaining a safe distance: The trainer opens the activity with the following words and writes “Thermometer” and “Thermostat” on the board:
“Dear colleagues, in daily life our neighbours, relatives or people in our social circle may sometimes make unfair demands that cross our boundaries and disregard our plans. They may do so through emotional pressure such as ‘kindness’, ‘being a good neighbour’ or ‘You are being rude’, or through a forceful tone — the Shark strategy. At that moment, what we do is of vital importance:
If you become a ‘Thermometer’:You act according to the temperature of the environment. When the other person imposes something on you, you may flare up, shout and argue; or, conversely, you may shrink back, accept an unwanted task so as not to appear rude, and then resent the person for days. In both cases, you fail to protect your boundary.
If you become a ‘Thermostat’:You do not allow the other person’s pressure to determine your response. You maintain a safe emotional distance. Without taking the person’s impulsive or insistent behaviour personally, you respond calmly but firmly and regulate the emotional temperature of the situation through your own calmness. You do not need to shout to protect your boundary; you make your words clear.”
Everyday-life case scenario: The trainer reads the case to the group or projects it on the board:
Case: You have completed a very busy and tiring week. You have been looking forward to spending the weekend alone at home, resting and clearing your mind. On Saturday morning, the doorbell rings. You open the door and find your upstairs neighbour standing there with their keys. In an agitated, insistent and completely imposing tone — the Shark style — the neighbour says:
“Ayşe/Ahmet, I have to leave the city urgently. I am leaving the key with you for the weekend. Go into our flat twice a day, feed the cat, give it water and water the flowers. I do not want any objections; we are neighbours, after all. What is the point of living next to one another if we do not help? I am leaving it to you!” Before you can answer, the neighbour places the keys on the table and begins to leave.
Step-by-step case analysis in “Thermostat Mode”
The trainer asks participants: “How can we use professional ‘I’ language in this situation without turning the relationship into hostility, but also without sacrificing the weekend rest that we need so much?”
The assertive intervention plan is structured on the board in three steps:
1. Create a safe emotional distance (inner thermostat)
When your neighbour places the key on the table and creates pressure through guilt, silence for three seconds the primitive reactions that your brain produces: ‘It would be rude; accept it’ (Passive), or ‘How disrespectful; take your key and leave’ (Aggressive). Breathe out deeply. Recognise that the neighbour’s haste and imposition belong to them, not to you, and create emotional distance. Straighten your posture and establish clear eye contact.
2. Reflect the other person’s situation (begin without blame)
If you begin directly with “How thoughtless you are”, you become a thermometer. Instead, begin with a sentence that shows you have heard how difficult the situation is for the other person:
“Ms Esra, I hear and understand that an urgent situation has arisen and that you are under considerable pressure to find a solution for your home while you are away.”
3. Use assertive “I” language and state your personal boundary
After indicating that you understand the other person, state your own boundary and need immediately and with unwavering clarity:
“...However, I have also completed a very intense and exhausting week. I have a strong need to spend this weekend resting completely at home and taking time for myself. Therefore, I cannot take on this responsibility this weekend and I cannot accept the key. If you wish, we can quickly consider an alternative, such as asking another neighbour. What do you think?”
Question for the trainer
After completing the analysis, the trainer turns to the group and asks:
“Dear colleagues, how many times in daily life have we given up our own rights and fallen into the Passive Triangle because we could not say ‘No’ to a neighbour, friend or relative? The more we practise the ability to remain a ‘Thermostat’ and use ‘I’ language in daily life, the more we protect ourselves from unnecessary burdens of stress. What do you think will change when we take this daily-life skill with us into our work with children in the institution and into our personal lives?”
STEP 5: BODY LANGUAGE AND TONE
STEP 5: Using body language and tone of voice
Note for the trainer: However assertive the words may be, help participants experience physically that the message loses its power when body language is passive or aggressive.
Method: Physical activity. Ask participants to enact how to approach children with a “firm but caring” stance.
Materials: A sufficiently large activity area.
Implementation steps:
Physical adjustment exercise: The trainer asks participants to stand and form pairs in the room. The trainer writes the following fixed assertive statement on the board: “I am busy at the moment; I will come back in ten minutes.” The trainer gives instructions in turn, and partners face one another and say the same sentence in each of the following three modes:
Passive posture: Shoulders lowered, head down, no eye contact, voice at a whisper.
Aggressive posture: Chest excessively pushed forward, finger pointing, hard eye contact, loud and threatening voice.
Assertive posture (“Stand Tall, Speak Firmly”): Feet balanced on the floor, shoulders upright, direct but calm eye contact, and a clear, firm tone of voice.
“As you have seen, the words we used were exactly the same in all three rounds. In the first round our boundary was not taken seriously because we appeared like a Turtle; in the second round, even though we used a polite sentence, we attacked the other person because we appeared like a Shark.
When we speak, children observe not only our words but also the energy conveyed by our body. Assertiveness begins in the body. By bringing the rule ‘Stand Tall, Speak Firmly’ into daily life, we show children that it is possible to protect boundaries without raising one’s voice.”
STEP 6: Supporting social skills
STEP 6: Supporting social skills
Note for the trainer: Remind participants that, for children’s assertiveness to develop, their boundaries within the institution must be respected — for example, by knocking on the door of their room and asking for their opinion. Discuss “Choice Time” practices that encourage children to state their own preferences openly during the day, such as which game they wish to play.
Method: Questions and answers.
Materials: Whiteboard.
Implementation steps:
Integration into daily life: The trainer asks the group: “Within the institution’s daily practices and routines, how can we support children’s assertive self-expression so that they are not left passive and disregarded or become aggressive and attack others?”
Gathering ideas from practice: The trainer lists participants’ practical suggestions on the board — for example, “When children say no, give them space for their decisions instead of becoming angry”, and “Encourage them to defend their position using ‘I’ language during group meetings”.
The trainer’s summary and connection of the ideas on the board:
“Dear colleagues, the excellent ideas from practice that we have written on the board show us a very clear truth: the child’s assertiveness develops not in a laboratory, but within daily routines. If we do not want children in the institution to remain passive and be disregarded or to become aggressive and attack others, we must create safe spaces in which they can be assertive. The first rule is very simple: a child whose boundaries are not respected cannot learn to set boundaries.
If we enter a child’s room abruptly without knocking, we silently communicate: ‘Your boundaries are unimportant; anyone with enough power may violate them.’ The child sees this and either submits — becoming passive — or repeats the same behaviour towards a peer — becoming aggressive.
For this reason, small daily practices are of vital importance. Simple but important actions, such as knocking before entering a child’s room and asking for the child’s opinion before doing something concerning them, communicate: ‘I am valuable and I have boundaries; I am respected. This is what respect looks like.’”
STEP 7: End-of-session reinforcement
STEP 7: End-of-session reinforcement
Note for the trainer: Reinforce assertiveness through a memorable image as a synthesis of the five content modules of the training — RULER, Brain Modes, Empathy and Conflict Resolution. Ask participants to answer the question, “What is the first thing I will say tomorrow when helping a child to defend themselves?” and use their responses to conclude the session.
Method: Metaphor/anecdote.
Implementation steps:
The Boundary Compass metaphor: The trainer reinforces the module with the following words:
“Dear caregivers, assertiveness is neither an aggressive fortress that builds impenetrable walls around itself and attacks everyone who approaches, nor a passive piece of land without boundaries that anyone may trample upon. Assertiveness is a safe bridge with a clearly defined entrance and boundaries, extending towards other people when a connection is needed. We will neither allow our boundaries to be violated passively nor protect them by aggressively overriding other people. Recognising our own value and the value of the child and colleague before us, we will build the bridge ‘I am valuable, and you are valuable’.”
STEP 8: Evaluation and closing
STEP 8: Evaluation and closing
Note to the trainer: This step closes both Session 6 and the entire training programme. Give participants an opportunity to make concrete the knowledge and skills acquired throughout the six sessions. Conclude by strengthening their sense of international solidarity and professional pride.
Method: Oral feedback.
Implementation steps:
Large closing circle: The trainer asks all participants to stand shoulder to shoulder in a circle and poses the following final question:
“Dear colleagues, today we have completed the six-session Emotional Intelligence journey that began when we said ‘Hello’ in the first session. We have placed RULER, the Brain Modes, the Turtle Technique, Theraplay games, the Empathy Glasses, the Five Animal Strategies and Assertiveness into our toolkit. As you return to your institution today, what is the most important promise you make to yourself about becoming an ‘Emotion Coach’ and an ‘Unshakeable Thermostat’ in the lives of disadvantaged children?”
After receiving each participant’s feedback in turn, the trainer congratulates everyone on the significant effort they devote to the institution and to children’s lives, and successfully concludes the training.
Programme summary: The trainer quickly lists the key concepts from all sessions on the board: Session 1 — Safe Group Connection and the Importance of EQ. Session 2 — The RULER Method and the Mood Meter. Session 3 — Crisis Management and the Turtle Technique. Session 4 — Empathy Glasses and the Three-Step Formula. Session 5 — Social Skills and the Five Animal Strategies. Session 6 — Assertiveness and the Boundary Compass.
Closing remarks: The trainer concludes the session as follows: “Dear colleagues, we all share the same aim — to ensure that disadvantaged children grow up in a safe, caring and supportive environment. Through the knowledge and activities relating to emotional intelligence skills that you have gained in this training, you will develop greater awareness in your own lives and strengthen your emotional intelligence skills. By taking this awareness into practice, you will also contribute to equipping disadvantaged children with these skills.”
Final question: As the trainer closes the circle, each participant is asked: “During this six-session journey, what is the first concrete step you will take tomorrow, when you return to your institution, to make a difference in a child’s life?” The responses are welcomed with applause and the programme formally ends.
REFERENCES
REFERENCES
Rivers, S. E., Tominey, S. L., O’Bryon, E. C., & Brackett, M. A. (2013). Developing emotional skills in early childhood settings using Preschool RULER. Psychology of Education Review, 37(2), 19-25.
Gottman, J. M., & DeClaire, J. (1997). The heart of parenting: How to raise an emotionally intelligent child. Simon & Schuster.
Martinez-Pampliega, A., Ortuño, A., & Mónaco, E. (2025). Assessment of the effectiveness of the parenting intervention programme “Intelligent Families”: A randomised controlled study. Social Sciences, 14(3), 175.
Severinsen, L., Stiegler, J. R., Nissen-Lie, H. A., Shahar, B., & Zahl-Olsen, R. (2022). Effectiveness of emotion focused skills training for parents: study protocol for a randomized controlled trial in specialist mental health care. BMC Psychiatry, 22(1), 453.
Rutherford, H. J. V., Wallace, N. S., Laurent, H. K., & Mayes, L. C. (2015). Emotion regulation in parenthood. Developmental Review, 36, 1-14.
Lee, G., & Kim, S. (2019). An integrative review on the contents and effectiveness of emotion coaching interventions for parents. Journal of Korean Academy of Psychiatric and Mental Health Nursing, 28(1), 64-78.
Brann, V. V. (2001). The effect of educational programs on emotional intelligence [Doctoral dissertation, Oklahoma State University].
Martin, B. C. (2021). Mindful, aware parenting: The pathway to raising emotionally regulated children [Master’s thesis, Lesley University].
Platsidou, M., & Tsirogiannidou, E. (2016). Enhancement of emotional intelligence, family communication and family satisfaction via a parent educational program. Journal of Education and Practice, 7(28), 108-117.
Motamedi, F., Ghobari-Bonab, B., Beh-pajooh, A., Shokoohi Yekta, M., & Afrooz, G. A. (2017). Developing an emotional intelligence program training and study its effectiveness on emotional intelligence of adolescents with emotional and behavioral problems that living in single parent families. Journal of Education and Learning, 6(2), 101-117.
Chan, R. F.-Y., Qiu, C., & Shum, K. K. M. (2021). Tuning in to Kids®: A randomized controlled trial of an emotion coaching parenting program for Chinese parents in Hong Kong. Journal of Child and Family Studies, 31(4), 1673-1687.
Bariola, E., Gullone, E., & Hughes, E. K. (2011). Child and adolescent emotion regulation: The role of parental emotion regulation and expression. Clinical Child and Family Psychology Review, 14(2), 198-212.
Nurhayati, S., & Rosita, T. (2020). Positive parenting training program implementation to increase parents’ emotional intelligence in raising well being children. Proceedings of the International Conference on Early Childhood Care, Education and Parenting (ICECCEP 2019), 78-82. Atlantis Press.
Özdemir Cihan, M. (2020). Sınıf öğretmeni adaylarının duygusal zeka gelişimine yönelik program geliştirilmesi ve etkililiğinin incelenmesi: Karma yöntem çalışması [Doktora tezi, Atatürk Üniversitesi].
Özçelik, M. (2007). Duygusal zeka becerileri eğitimi programının şehit ailelerinin depresyon ve anksiyete düzeylerine etkisi [Doktora tezi, Ondokuz Mayıs Üniversitesi].
Sayan, Ö. F. (2008). Duygusal zeka modeli oluşturulması [Doktora tezi, İstanbul Üniversitesi].
Özkan, M. S. (2021). Psikolojik sağlamlık odaklı psiko-eğitim programının bir grup yetişkinin psikolojik sağlamlık, duygusal zeka ve toplumsal ilgi düzeylerine etkisinin incelenmesi [Doktora tezi, Bursa Uludağ Üniversitesi].
Akyıl, Y. (2022). Yaratıcı drama temelli duygusal zeka geliştirme programının etkililiğinin incelenmesi [Doktora tezi, Yıldız Teknik Üniversitesi].
Kılıçkaya, C. (2024). Bilişsel davranışçı terapi temelli psikoeğitim programının özel öğrenme güçlüğü olan ergenlerin duygusal zekâ ve sosyal kaygı düzeylerine etkisi [Doktora tezi, Atatürk Üniversitesi].
Thomas, K. W. (1992). Conflict and conflict management: Reflections and update. Journal of Organizational Behavior, 13(3), 265-274.
Paavola, L. E. (2017). The importance of emotional intelligence in early childhood [Bachelor’s thesis, Laurea University of Applied Sciences].
Ulutaş, İ. (2005). Anasınıfına devam eden altı yaş çocuklarının duygusal zekalarına duygusal zeka eğitiminin etkisinin incelenmesi [Doktora tezi, Gazi Üniversitesi].
APPENDICES
APPENDICES
EMPOWERED BY EMPATHY
Emotional Intelligence Training Programme in the Care of Disadvantaged Children
PRE-TEST / POST-TEST FORM
PRE-TEST / POST-TEST FORM
|
Participant: |
____________________ |
|---|---|
|
Date: |
____________________ |
|
Type of administration: |
☐ Pre-test (beginning of Session 1) ☐ Post-test (end of Session 6) |
|
This form is not an examination. There are no right or wrong answers. Please answer every question honestly. |
1. When a child suddenly starts crying, what is the first thought that comes to mind?
☐ I ask, “Stop crying; why are you crying?”
☐ I say, “Do not cry; it will pass. There is nothing to be upset about.”
☐ I go to the child, stay present without saying anything at first, and say, “We can talk when you are ready.”
☐ I often do not know what to do.
2. How would you define the concept of “Emotional Intelligence (EQ)”? (Write briefly in your own words.)
________________________________________________________________________________
________________________________________________________________________________
________________________________________________________________________________
3. Which of the following emotions do you believe have a functional role in children — that is, a protective or development-supporting role? (You may select more than one.)
☐ Anger ☐ Sadness ☐ Fear ☐ Pleasure/Joy ☐ Love ☐ Surprise ☐ Disgust ☐ Shame
☐ All of them have a function. ☐ Negative emotions have no function.
4. When a child is experiencing an anger outburst — shouting and throwing objects — what do you do? (Select the response you use most often.)
☐ I raise my voice and say, “Stop!”
☐ I intervene immediately and physically restrain the child.
☐ I remain calm, move closer and say softly, “I am here; I am with you.”
☐ I become unsure about what to do.
5. Do you agree with the statement, “Anger is a natural emotion, while aggression is an unacceptable behaviour”?
☐ Strongly agree.
☐ Partly agree.
☐ Disagree.
☐ Not sure.
6. What do you do when you have to continue working with children while you yourself feel stressed or angry?
________________________________________________________________________________
________________________________________________________________________________
________________________________________________________________________________
7. Which of the following two statements best describes empathy?
☐ “I feel very sorry for you.”
☐ “Going through this must have placed you in a very difficult situation; I understand.”
8. What would you say if a child told you, “Nobody loves me”? (Write in your own words.)
________________________________________________________________________________
________________________________________________________________________________
________________________________________________________________________________
9. Is the following statement correct? “Validating a child’s emotion also means approving the child’s behaviour.”
☐ Yes, it is correct.
☐ No, it is incorrect.
☐ Not sure.
10. How do you usually intervene when two children are fighting in the institution?
☐ I decide who is right.
☐ I separate both children and speak with them individually.
☐ I guide them in finding their own solutions.
☐ I am often unsure how to intervene.
11. Which of the following do you do during conflict?
☐ I insist on winning even when the other person is right.
☐ I say, “You take one step and I will take one step”, and seek a compromise.
☐ I try to understand the real needs of both parties and seek a new solution that meets both.
☐ I give up my own need so that the other person will be happy.
12. Are there situations in which you find it difficult to say “No”?
☐ Very often.
☐ Sometimes.
☐ Rarely.
☐ Never.
13. Can you explain the difference between “you” language and “I” language?
________________________________________________________________________________
________________________________________________________________________________
________________________________________________________________________________
14. Label each of the following statements as ‘Passive’, ‘Aggressive’ or ‘Assertive’:
|
Statement |
Label |
|---|---|
|
“You always do this!” |
___________________ |
|
“All right, we will do whatever you say.” |
___________________ |
|
“This situation makes me uncomfortable; can we talk about it?” |
___________________ |
15. Rate yourself from 1 to 5 in each of the following areas:
|
(1 = Not at all competent → 5 = Highly competent) | |
|---|---|
|
Area |
Score |
|
Recognising children’s emotions |
☐ 1 ☐ 2 ☐ 3 ☐ 4 ☐ 5 |
|
Remaining calm during a crisis |
☐ 1 ☐ 2 ☐ 3 ☐ 4 ☐ 5 |
|
Empathising with a child |
☐ 1 ☐ 2 ☐ 3 ☐ 4 ☐ 5 |
|
Resolving conflicts constructively |
☐ 1 ☐ 2 ☐ 3 ☐ 4 ☐ 5 |
|
Managing my own emotions |
☐ 1 ☐ 2 ☐ 3 ☐ 4 ☐ 5 |
|
Setting boundaries / being able to say “No” |
☐ 1 ☐ 2 ☐ 3 ☐ 4 ☐ 5 |
16.
☐ Pre-test: What do you most want to learn from this training?
☐ Post-test: What has changed most for you as a result of this training?
|
Thank you for your participation and honesty. • Empowered by Empathy — Erasmus+ KA210-ADU |
|---|